God of Warfare: Ragnarok Walkthrough & Collectibles Information. The brand new God of Warfare Ragnarok (2022) has all kinds of goodies to assemble throughout your bloody journey. Under you’ll find an entire information for GOW Ragnarok collectibles damaged down by space with detailed info, map hyperlinks in addition to ideas so that you don’t miss something. Now we have a full record of all Artifacts, all Relics, full Nornic Chest Puzzle Information, all of Favors and Aspect Quests, in addition to the various post-game occasions.
Please go to our God of Warfare Map (Interactive) that features a guidelines with 100% collectibles in recreation.
God of Warfare Ragnarok 100% Collectibles Map Information
GOW Ragnarok Collectibles by Space Fast Nav
- Vanaheim:
 Artifacts x9,
  4/4 Relic ,
  Lore x31,
  Odin’s Ravens x15,
  Nornir Chests x11,
  Legendary Chests x13,
  Yggdrasil Rifts x4,
  Berserker Gravestones x2, Berserker Gravestones x2,
  Remnants of Asgard x2,
  Hel Tears x1,
  9 Realms in Bloom x1, Scent of Survival x1, Dragon Hunts x7, Casualties of Warfare x5, Epic Hunts x2, A Stag for All Seasons x4, River Delta Favors x5
 - Alfheim Artifacts x11, 2/2 Relic , Lore x19, Odin’s Ravens x10, Nornir Chests x7, Legendary Chests x12, Yggdrasil Rifts x1, Berserker Gravestones x2, Berserker Gravestones x1, Remnants of Asgard x2, Hel Tears x1, 9 Realms in Bloom x1, The Elven Sanctum x1, Freyr’s Reward x1, The Desert Door x1, Secret of the Sands x1, Music of the Sands x1
- Niflheim: Nornir Chests, 2/2 Relic x1, Legendary Chests x7, Berserker Gravestones x1, 9 Realms in Bloom in Bloom x2, Tree of Woe x1, The Damaged Jail x1
- Muspelheim: Lore x1, Odin’s Ravens x2, Nornir Chests x2, Legendary Chests x1, Remnants of Asgard x1, 9 Realms in Bloom in Bloom x1, Muspelheim Crucible x15, Defend Your Valor x1
- Midgard: Artifacts x7, 3/3 Relic, Lore x10, Odin’s Ravens x6, Nornir Chests x4, Legendary Chests x7, Yggdrasil Rifts x3, Berserker Gravestones x2, Berserker Gravestones x1, Remnants of Asgard x2, Hel Tears x1, 9 Realms in Bloom x1, Kol Raider Camps x4, Sigrun’s Curse x1, Guiding Mild x4
- Svartalfheim: Artifacts x11, 3/3 Relic, Lore x17, Odin’s Ravens x13, Nornir Chests x10, Legendary Chests x13, Yggdrasil Rifts x7, Berserker Gravestones x3, Berserker Gravestones x2, Remnants of Asgard x3, Hel Tears x1, 9 Realms in Bloom x1, Mining Rigs x3, The Weight of Chains x1, The Misplaced Treasure x2, Spirit of Rebel x1, A Viking Funeral x1
- Jotunheim: 9 Realms in Bloom in Bloom x1
- Helheim: Lore x2, Odin’s Ravens x2, Hel Tears x1, 9 Realms in Bloom in Bloom x1
Full record of collectibles
Vanaheim
All Collectibles for GOW Ragnarok Vanaheim: ![]()
![]() Artifacts x9,
Artifacts x9, ![]() Lore x31,
Lore x31, ![]() Odin’s Ravens x15,
Odin’s Ravens x15, ![]() Nornir Chests x11,
Nornir Chests x11, ![]() Legendary Chests x13, , Yggdrasil Rifts x4,
Legendary Chests x13, , Yggdrasil Rifts x4, ![]() Berserker Gravestones x2,
Berserker Gravestones x2, ![]() Berserker Gravestones x2,
Berserker Gravestones x2, ![]() Remnants of Asgard x2,
Remnants of Asgard x2, ![]() Hel Tears x1,
Hel Tears x1, ![]() 9 Realms in Bloom x1,
9 Realms in Bloom x1, ![]() Scent of Survival x1,
Scent of Survival x1, ![]() Dragon Hunts x7,
Dragon Hunts x7, ![]() Casualties of Warfare x5,
Casualties of Warfare x5, ![]() Epic Hunts x2,
Epic Hunts x2, ![]() A Stag for All Seasons x4,
A Stag for All Seasons x4, ![]() River Delta Favors x5
River Delta Favors x5
Cliffside Ruins
![]()
![]() Nornir Chest 1/1 – Map Hyperlink
Nornir Chest 1/1 – Map Hyperlink
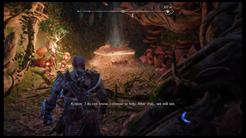
The chest is positioned exterior Cliffside Ruins, west of the south rock wall, the place Gunhild seems to ask for a favor and the chain to get to Freya’s Runic Learn is positioned . The primary system to open the chest is positioned simply across the giant rock to the west . Soar to the rocks north of the chest and use Freya’s Sigil Arrows to burn the vegetation protecting it, then use your axe to set the letter displayed on the chest. The second system is positioned on the river shore throughout the spot the place Lúnda, Brok and the Mystic Gateway are. Cross to their aspect to have a transparent view of the system . The third system is a bit more durable to identify, as it’s only seen from above. This one is positioned subsequent to the chain used to go up the platform to make use of Freya’s Runic Learn and unlock the trail to The Veiled Passage. To get a transparent view of it, you have to go up the platforms in entrance of the cliff, the identical one from which you burn the branches blocking the chain.


![]()
![]() Legendary Chest 1/1 (Mists of Helheim – Heavy Runic Assault) – Map Hyperlink
Legendary Chest 1/1 (Mists of Helheim – Heavy Runic Assault) – Map Hyperlink
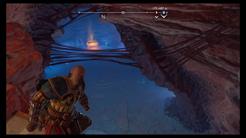
The chest is throughout the shore the place Lúnda, Brok and the Mystic Gateway are positioned . As a way to get to it, you could first clear the best way to The Veiled Passage by utilizing Freya’s Runic Learn on the platform on high of the cliff. When you undergo The Veiled Passage -the cave the place the Seior Fanatics Gunhild asks you to slay are located- you’ll come throughout a bridge that upon activation can be utilized as a shortcut. Simply earlier than the bridge, to your proper (north), there’s a ledge which you need to use to descend and attain the chest. Use Freya’s Sigil Arrows to clear the vegetation blocking the best way .
To entry The Veiled Passage you have to disengage the magic sealed wall by making Freya learn the runic phrases. When you land on the shore exterior Cliffside Ruins, head straight south till you attain the rock wall, subsequent to the spot the place Gunhild seems to ask for a favor. Use the chain hanging from the rocks to climb to a small space the place you’ll discover the system for Freya’s rune learn.


![]()
![]() Lore 1/1 (Lore Marker – Name to Arms) – Map Hyperlink
Lore 1/1 (Lore Marker – Name to Arms) – Map Hyperlink
When you undergo the cave with the Reavers inside, you’ll discover a chain you need to use to rappel down. This can take you to a platform the place you may decrease a bridge permitting you to shortcut from and to Cliffside Ruins’ foremost space. Reverse to the bridge, that’s, east of the chain used to descend, you’ll discover the Lore Marker (‘‘Name to Arms’’). To entry The Veiled Passage you have to disengage the magic sealed wall by making Freya learn the runic phrases. When you land on the shore exterior Cliffside Ruins, head straight south till you attain the rock wall, subsequent to the spot the place Gunhild seems to ask for a favor. Use the chain hanging from the rocks to climb to a small space the place you’ll discover the system for Freya’s rune learn.
![]()
![]() River Delta Favors 1/1 – Map Hyperlink
River Delta Favors 1/1 – Map Hyperlink
When you attain The Veiled Passage and land on the shore with the three skeletons hanging from above, break the picket gate to your left (west) and climb the south wall. Flip proper to the open-ended cave with the 2 Reavers. Go proper (north) and observe the trail to the subsequent part the place you’ll discover extra Reavers. Then, return to Gunhild. She is going to grant you Svartalfheim’s Honor (Amulet Enchantment).
To entry The Veiled Passage you have to disengage the magic sealed wall by making Freya learn the runic phrases. When you land on the shore exterior Cliffside Ruins, head straight south till you attain the rock wall, subsequent to the spot the place Gunhild seems to ask for a favor. Use the chain hanging from the rocks to climb to a small space the place you’ll discover the system for Freya’s rune learn.
Jap Barri Woods
![]()
![]() Odin’s Ravens 1/1 – Map Hyperlink
Odin’s Ravens 1/1 – Map Hyperlink
As quickly as you arrive at Jap Barri Woods, observe Atreus round. Use the Draupnir spear to create a path, enter by means of there and take the correct path. Destroy the impediment utilizing the sigil arrow and the blades of chaos. You’ll arrive at a purple chest. Flip you again on it and look to your left aspect to discover a Raven.
![]()
![]() Lore 1/2 (Lore Scroll – The Aesir Promise) – Map Hyperlink
Lore 1/2 (Lore Scroll – The Aesir Promise) – Map Hyperlink
As quickly as you arrive at Jap Barri Woods, observe Atreus round. Use the Draupnir spear to create a path, enter by means of there and take the left path. Proceed ahead and as quickly as you’ll be able to flip left to a different path do it, proceed ahead to seek out the scroll.
![]()
![]() Nornir Chest 1/1 – Map Hyperlink
Nornir Chest 1/1 – Map Hyperlink
As quickly as you arrive on Jap Barri Woods, observe Atreus round. Use the Draupnir spear to create a path, enter by means of there and take the left path. Proceed ahead and as quickly as you’ll be able to flip left to a different path do it, proceed ahead till the tip of the trail to enter a chapel-like construction, to seek out the Nornir Chest. The primary room could be seen from the damaged “window” on to the left of the chest. The second could be discovered, earlier than coming into the realm with the chest. Flip again from the place you got here and look to your proper. You must use the sigil arrows after which the Blades of chaos to burn the branches holding the system, in an effort to make it operative. To seek out the third one, enter the realm with the Nornir Chest, however take the opposite exit. Face the enemy ready there, search for one other chapel-like construction, positioned barely to the correct of the display screen. Calculate your axe throws to maneuver the system and choose the rune. Return to the Nornir Chest to open it.


![]()
![]() Lore 2/2 (Rune Learn – Verdant) – Map Hyperlink
Lore 2/2 (Rune Learn – Verdant) – Map Hyperlink
After you break the picket partitions with the Blades of Chaos, enter the constructing and switch to your left to seek out the Rune Learn.
![]()
![]() Remnants of Asgard 1/1 – Map Hyperlink
Remnants of Asgard 1/1 – Map Hyperlink
After ending the story, Go previous and thru the picket construction lined in vegetation that’s positioned subsequent to the river.
The Deserted Village
![]()
![]() 1/1 Relic (Hilt of Tyrfing) – Map Hyperlink
1/1 Relic (Hilt of Tyrfing) – Map Hyperlink
Blatonn miniboss on the Deserted Village, drops Nar’s Cup. Gamers want this merchandise to craft the Hilt of Tyrfing.
![]()
![]() Odin’s Ravens 1/1 – Map Hyperlink
Odin’s Ravens 1/1 – Map Hyperlink
From the wall that the Einherjar Thief breaks, look to your left to discover a Raven hidden in the course of a tree.

![]()
![]() Lore 1/2 (Rune Learn – Prayer to Freya) – Map Hyperlink
Lore 1/2 (Rune Learn – Prayer to Freya) – Map Hyperlink
Upon first coming into The Deserted Village, proceed to observe the trail forward by means of the arch in entrance of you. The Prayer is written on the wall to the left.
![]()
![]() Legendary Chest 1/3 (Rond of Restoration -Defend Attachment) – Map Hyperlink
Legendary Chest 1/3 (Rond of Restoration -Defend Attachment) – Map Hyperlink
From the doorway to The Deserted Village, use the crane in your left to advance to the subsequent cabin. Subsequent use the identical system and place it to the place it was beforehand, in order to hook over the water in your left. Head west throughout a small bridge right into a cave -the one with the Berserker Headstone in it- and undergo a small passage on the wall on the northern aspect of the tunnel. Subsequent climb the ledges and soar into the jaded cabin the place the chest is.


![]()
![]() Legendary Chest 2/3 (Shatter Star Defend – Defend) – Map Hyperlink
Legendary Chest 2/3 (Shatter Star Defend – Defend) – Map Hyperlink
From the gate on the east aspect of the second main space, go left (north) and observe the linear path. Use the axe to deactivate the purple flames forward by smashing the big plant behind them with it. When you get to the platform with the toxic vegetation, use your blades to burn the blue vines above and launch a rope you may climb with. The chest is beneath forward and, identical to earlier than, you’ll must deactivate the blue mist by smashing the system down there together with your axe.

![]()
![]() Nornir Chest 1/1 – Map Hyperlink
Nornir Chest 1/1 – Map Hyperlink
First, whereas going through the big picket crane, use your blades to set on fireplace the blue vines that keep the bucket caught. This can launch it and ignite the within of it. Subsequent, use your axe to smash the circle items on the crane and place the longer arm in an effort to hook over to the platform south of you. Then reposition the crane and place the bucket between the platform you’re on high of now and the blocked aspect of the bridge. Use the blades to steadiness the bucket near you and launch it in order to make it collide with the blue vines blocking the trail. Shortly flip to hit the round items on the crane for it to maneuver clockwise whereas the bucket is farthest from you. As soon as the trail’s been cleared, return to the primary platform and hook over to the opposite aspect of the bridge. The Nornir Chest is on the trail beneath the bridge. The primary system to open the chest is true in entrance of it, whereas the opposite two are simply south of every of the 2 elements of the damaged bridge you crossed earlier than. As a way to activate the final two, use the identical technique as for clearing the bridge, that’s, balancing the bucket in opposition to every of them.


![]()
![]() Legendary Chest 3/3 (Helios Flare – Mild Runic Assault) – Map Hyperlink
Legendary Chest 3/3 (Helios Flare – Mild Runic Assault) – Map Hyperlink
Undergo the opening on the wall positioned south-west of the crane, and observe the quick path round it. Use your blades to tumble down the column on the opposite aspect of the wall. This can help you flip the crane counter-clockwise and place it so you may return to the primary platform and hook over to the one with the column you simply introduced down . Comply with the trail and reposition the crane once more to hook to the third platform the place you’ll discover the chest.


![]()
![]() Lore 2/2 (Chores) : – Map Hyperlink
Lore 2/2 (Chores) : – Map Hyperlink
After the earlier Legendary Chest, climb up the subsequent ledge after which use the rope to drop down throughout the water. Then, throw a spear on the wall to your left, swing throughout and go proper to assemble the Lore scroll on the left from the bottom.
Freyr’s Camp
![]()
![]() Lore 1/2 – (Scroll – Freyr’s Lament) – Map Hyperlink
Lore 1/2 – (Scroll – Freyr’s Lament) – Map Hyperlink
From Brok’s location inside Freyr’s Camp, head west to the opposite aspect of the camp. The scroll lies between a campfire and a tent.
![]()
![]() Legendary Chest 1/2 (Leviathan’s Roar – Heavy Runic Assault) – Map Hyperlink
Legendary Chest 1/2 (Leviathan’s Roar – Heavy Runic Assault) – Map Hyperlink
Within the space the place you combat the Gulon and the Nokken, climb the wall of the constructing in addition to the torch. As soon as within the higher stage transfer to the farthest edge, till a immediate seems to leap to the opposite wall. Climb to the aspect till you handle to stand up on the opposite aspect.


![]()
![]() Lore 2/2 (Rune Learn -Vanaheim Lullaby) – Map Hyperlink
Lore 2/2 (Rune Learn -Vanaheim Lullaby) – Map Hyperlink
As you enter the cave; use the Draupnir spear twice to create two paths. Proceed the trail to seek out the rune learn in your left.
![]()
![]() Odin’s Raven 1/1 – Map Hyperlink
Odin’s Raven 1/1 – Map Hyperlink
Cross the bridge and observe the primary path till you get to a bifurcation marked with a two-horned statue. Go left (southeast) till you attain a ledge going through the river. In entrance of you, subsequent to a big, blue ring there’s a leaning tree – the Raven is on high of one of many branches closest to the ring.
![]()
![]() Artifact 1/1 (Household Crests – Skirnir’s Crest) – Map Hyperlink
Artifact 1/1 (Household Crests – Skirnir’s Crest) – Map Hyperlink
Present in a small space in addition to a floating trunk that’s blocking the river.
![]()
![]() Legendary Chest 2/2 – Map Hyperlink
Legendary Chest 2/2 – Map Hyperlink
After the earlier Rune Learn, take your left and soar over the pond, use the spear to destroy glowing rock. Then you may entry this legendary chest.

![]()
![]() Remnants of Asgard 1/1 – Map Hyperlink
Remnants of Asgard 1/1 – Map Hyperlink
Go to the earlier Lore location. Then take the trail behind it and throw the spear to the wall so you may swing throughout to achieve the river. Defeat the enemies in your left.
Goddess Falls
![]()
![]() Odin’s Raven 1/1 – Map Hyperlink
Odin’s Raven 1/1 – Map Hyperlink
From the Pink Chest, head again to the earlier platform, then climb up the cliff. Soar over each waterfalls and from that platform it is possible for you to to take down an Odin’s Raven.

![]()
![]() Nornir Chest 1/1 – Map Hyperlink
Nornir Chest 1/1 – Map Hyperlink
The Nornir Chest could be discovered on the correct platform from the hidden door that Freya opens for you. To open it, you could first hit the three runes. To destroy the primary one, stand subsequent to the Orange Chest. The opposite one is to the correct of the hidden door. After you’ve got destroyed each buildings, you may go to the Nornir chest and open it to get an Iddun apple. The third one is on the correct platform from the Nornir Chest.


![]()
![]() Lore 1/1 (Lore Marker – Something I Can Do) – Map Hyperlink
Lore 1/1 (Lore Marker – Something I Can Do) – Map Hyperlink
From the earlier Nornir’s Chest, go forward to the subsequent platform and climb down the wall utilizing your axe. Enter the cave the place you can see a Lore Marker.
![]()
![]() Buried Treasure 1/1 (x1 Dwarven Metal, x1 Honed Steel, x10 Shattered Rune, x1 Stonewood) – Map Hyperlink
Buried Treasure 1/1 (x1 Dwarven Metal, x1 Honed Steel, x10 Shattered Rune, x1 Stonewood) – Map Hyperlink
Buried Treasure (Treasure Map – Beneath the Rainbow). Get to the waterfall and soar throughout it. Then you definately discover the treasure on the correct aspect.
Nóatún’s Backyard
![]()
![]() Lore 1/3 (Treasure Map – Beneath the Rainbow) – Map Hyperlink
Lore 1/3 (Treasure Map – Beneath the Rainbow) – Map Hyperlink
After getting off the boat, head left till you see an space with a cloud of poison on the ground. Destroy the poison totem to get to the again nook the place you can see the “Treasure Map – Beneath the Rainbow”.
![]()
![]() Lore 2/3 (Lore Maker – Golrab of the Ashes and Frost) – Map Hyperlink
Lore 2/3 (Lore Maker – Golrab of the Ashes and Frost) – Map Hyperlink
After speaking with Astrid, head again just a few steps the place you can see the Lore Maker
![]()
![]() Artifact 1/1 (Household Crest – Hoenir’s Crest) – Map Hyperlink
Artifact 1/1 (Household Crest – Hoenir’s Crest) – Map Hyperlink
After the earlier Lore Maker, flip proper and keep away from the poison cloud to seek out this artifact on the bottom subsequent to the wall you have to climb subsequent.
![]()
![]() Lore 3/3 (Lore Marker – Backyard’s Progress) – Map Hyperlink
Lore 3/3 (Lore Marker – Backyard’s Progress) – Map Hyperlink
After the earlier Artifact, climb up the wall the place you can see this Lore Marker.
![]()
![]() Legendary Chest 1/1 (Jewel of Yggdrasil) – Map Hyperlink
Legendary Chest 1/1 (Jewel of Yggdrasil) – Map Hyperlink
From the earlier Scholarly Scroll, look to your proper, the place you will note a series. Use the Sigil arrows to destroy the roots that cowl it. Then use your ax to interrupt the chain and launch the counterweight to open the door in image 20. Return to the bridge and drop down utilizing the rope. As soon as on the bottom, search for the door you opened, defeat the enemies and it is possible for you to to open a Legendary Chest.


![]()
![]() River Delta Favors – Map Hyperlink
River Delta Favors – Map Hyperlink
After reaching the seashore, discuss to the ghost in entrance of the mirror door. So you have to destroy 3 poison totems. The primary is on the left. Freeze it and search for the purple explosive to its left to destroy it.
The second is on the correct. First you have to climb up the wall and shoot the explosive from the roof.
The third one is positioned within the center, search for a gap within the wall to shoot by means of it. After getting blown up all of the totems, discuss to the Quest giver to attain this River Delta Favor.
Pilgrim’s Touchdown
![]()
![]() Lore 1/1 (Lore Marker – Lifeless on Arrival) – Map Hyperlink
Lore 1/1 (Lore Marker – Lifeless on Arrival) – Map Hyperlink
On the west aspect of the realm between two drawbridges the place you combat some Reavers.
![]()
![]() Legendary Chest 1/1 (Grip of the Fallen Alchemist – Axe Attachment) – Map Hyperlink
Legendary Chest 1/1 (Grip of the Fallen Alchemist – Axe Attachment) – Map Hyperlink
Positioned on the platform north of the realm between two drawbridges the place you combat some Reavers. As a way to decrease the second drawbridge you have to break the 2 round items hooked up to it, one in every of which is roofed by blue vines. As a way to burn them, launch the hanging system east of your location that’s tied to a big tree. Use the blades’ hooks to steadiness the system and throw it close to the arch subsequent to it. As soon as one in every of its sides is alight, use Sigil Arrows to unfold the hearth to the opposite aspect of the system, and steadiness it the opposite strategy to clear the vines and destroy the remaining locking piece.


![]()
![]() Berserker Gravestones 1/1 – Map Hyperlink
Berserker Gravestones 1/1 – Map Hyperlink
After getting off the boat you’ll find it in the course of the island.
![]()
![]() River Delta Favors: 1/1 – Map Hyperlink
River Delta Favors: 1/1 – Map Hyperlink
After the earlier Berserker Headstone, search for the ghost behind it. It’s essential cross the bridge and collect the three elements. Then, return to the ghost so you may end the hunt.
River Delta
![]()
![]() Odin’s Raven 1/2 – Map Hyperlink
Odin’s Raven 1/2 – Map Hyperlink
From the platform with the Legendary Chest (On Pilgrim’s Touchdown), flip north-west and use your axe to achieve the Raven on the opposite aspect of the river. As a way to decrease the drawbridge and entry the platform, you have to break the 2 round items hooked up to it, one in every of which is roofed by blue vines. As a way to burn them, launch the hanging system east of your location that’s tied to a big tree. Use the blades’ hooks to steadiness the system and throw it close to the arch subsequent to it. As soon as one in every of its sides is alight, use Sigil Arrows to unfold the hearth to the opposite aspect of the system, and steadiness it the opposite strategy to clear the vines and destroy the remaining locking piece.

![]()
![]() Lore 1/2 (Lore Marker – Dwelling Masterpiece) – Map Hyperlink
Lore 1/2 (Lore Marker – Dwelling Masterpiece) – Map Hyperlink
Head south by means of the River Delta till you come throughout a zipline that goes over the stream. Land on the shore north of the zipline’s decrease finish.
![]()
![]() Artifact 1/1 (Household Crest – Odin’s Crest) – Map Hyperlink
Artifact 1/1 (Household Crest – Odin’s Crest) – Map Hyperlink
After the earlier purple chest, proceed your quest and get within the canoe. Cross the river till you attain a cave. As soon as there, get off the canoe and search for two giant flowers on the left the place you may seize this artifact from the bottom.
![]()
![]() Lore 2/2 (Scroll -Nonviolence) – Map Hyperlink
Lore 2/2 (Scroll -Nonviolence) – Map Hyperlink
You may collect this Scroll from the bottom subsequent to the earlier Pink Chest.
![]()
![]() Buried Treasure 1/1 The Large’s Toes (+10 Shattered Rune, +1 Stonewood, +1 Dwarven Metal, +1 Honed Steel, Vanaheim’s Energy – Amulet Enchantment) – Map Hyperlink
Buried Treasure 1/1 The Large’s Toes (+10 Shattered Rune, +1 Stonewood, +1 Dwarven Metal, +1 Honed Steel, Vanaheim’s Energy – Amulet Enchantment) – Map Hyperlink
Cross the Delta River till you attain the forge. On the correct you can see a Buried Treasure
![]()
![]() Artifact 2/2 (Household Crests – Freya’s Crest) – Map Hyperlink
Artifact 2/2 (Household Crests – Freya’s Crest) – Map Hyperlink
Subsequent to the earlier Buried Treasure you may decide up this Artifact.
![]()
![]() Yggdrasil Rifts 1/1 –
Yggdrasil Rifts 1/1 –
After the earlier Artifact, proceed up the steps and throughout the bridge till you attain this purple chest.
![]()
![]() River Delta Favors 1/1 –
River Delta Favors 1/1 –
To acquire this you have to settle for the Favor: The Mysterious Orb from Lunda.
![]()
![]() Odin’s Raven 2/2 – Map Hyperlink
Odin’s Raven 2/2 – Map Hyperlink
When you undergo the cave with the Reavers inside, you’ll discover a chain you need to use to rappel down. This can take you to a platform the place you may decrease a bridge permitting you to shortcut from and to Cliffside Ruins’ foremost space. Reverse to the bridge, that’s, east of the chain used to descend, you’ll discover a Lore Marker (‘‘Name to Arms’’), alongside a standard chest. You should utilize this spot to kill the Raven throughout the river. The Raven is east of your location, on high of a tree department near the water. To entry The Veiled Passage you have to disengage the magic sealed wall by making Freya learn the runic phrases. When you land on the shore exterior Cliffside Ruins, head straight south till you attain the rock wall, subsequent to the spot the place Gunhild seems to ask for a favor. Use the chain hanging from the rocks to climb to a small space the place you’ll discover the system for Freya’s rune learn.

The Jungle
![]()
![]() Lore 1/2 (Lore Marker – Unforgiven) – Map Hyperlink
Lore 1/2 (Lore Marker – Unforgiven) – Map Hyperlink
Positioned on the second platform (ranging from the south aspect)
![]()
![]() Dragon Hunts 1/3 (+4 Dragon Tooth) – Map Hyperlink
Dragon Hunts 1/3 (+4 Dragon Tooth) – Map Hyperlink
Spherical platform on the water
![]()
![]() Legendary Chest 1/2 (Whisper of the World – Mild Runic Assault – Draupnir Spear) – Map Hyperlink
Legendary Chest 1/2 (Whisper of the World – Mild Runic Assault – Draupnir Spear) – Map Hyperlink
Climb the wall east of the Celestial Altar location, after which head south till you may drop beneath to a path that goes east, taking you across the wall. When you attain the tip of it, go up the platform in your left (west) by hooking your method by means of. Use the big rock in entrance of you and the wall subsequent to it to advance. Use the Sigil Arrows to burn the branches on the platform on high of which the chest is positioned. Lastly, hook to the north aspect of the platform you’re standing on high of, and hook over the water to the platform with the Legendary Chest on it.


![]()
![]() Nornir Chest 1/1 – Map Hyperlink
Nornir Chest 1/1 – Map Hyperlink
First system is on high of a platform west of the chest. Second one is on high of a rock lined by branches, subsequent to the platform east of the Celestial Altar. Use the Sigil Arrows to clear the blocking vines. Final one is within the construction above the Celestial Altar, in an effort to get a transparent view you could go across the construction east of it and observe the trail. This is similar path used to entry the Legendary Chest. As soon as within the platform of the Legendary Chest, hook over to the west-most platform south-west of your location.


![]()
![]() Odin’s Raven 1/1 – Map Hyperlink
Odin’s Raven 1/1 – Map Hyperlink
On the platform the place you combat the Ogres, to the south. On high of a giant tree department over a Pink Chest.
![]()
![]() Dragon Hunt 2/3 (The Corpse Eater) – Map Hyperlink
Dragon Hunt 2/3 (The Corpse Eater) – Map Hyperlink
From the platform with the Legendary Chest, head west and go across the nook. Soar on the marked wall and observe the indicators whereas climbing to the highest.
![]()
![]() Lore 2/2 Rune Learn Metropolis of Risk – Map Hyperlink
Lore 2/2 Rune Learn Metropolis of Risk – Map Hyperlink
Down the cage used to lure Drake. When you rappel down, hit the revolving system on the north aspect, above the round piece, to exit the cage. Exit to the west aspect and observe the hall counter-clockwise.
![]()
![]() Legendary Chest 2/2 (Yields Jewel of Yggdrasil Amulet Fragment) – Map Hyperlink
Legendary Chest 2/2 (Yields Jewel of Yggdrasil Amulet Fragment) – Map Hyperlink
Down the cage used to lure Drake. When you rappel down, hit the revolving system on the north aspect, above the round piece, to exit the cage. Exit to the west aspect and observe the hall counter-clockwise.


![]()
![]() Artifacts 1/1 (Kvasir’s Poems – An Organisation: In The Future) – Map Hyperlink
Artifacts 1/1 (Kvasir’s Poems – An Organisation: In The Future) – Map Hyperlink
Throughout evening time, you have to entry the tunnel to The Jungle, then you may collect this Artifact close to a lifeless physique.
![]()
![]() Dragon Hunts 3/3 – Map Hyperlink
Dragon Hunts 3/3 – Map Hyperlink
From the earlier legendary chest, exit the room and take the enemies to the elevator and lure them together with your axe. Then raise up an elevator so you need to use the enemies to make the dragon kill them. Then go to the location the place the Stag was to return to the dragon’s den and kill him.
![]()
![]() Casualties of Warfare 1/1 – Map Hyperlink
Casualties of Warfare 1/1 – Map Hyperlink
After the earlier Raven, have a look at the nook throughout it and collect the purple merchandise.
![]()
![]() Seasonal Stags 1/1 – Map Hyperlink
Seasonal Stags 1/1 – Map Hyperlink
After the earlier dragon, return to the Mystic Gateway throughout day time. You should utilize the Celestial Altar. Use the boat to return to the island with the Ogres. Then use your Chaos Chains to go forward by means of the roots and swing throughout. There you’ll find the Seasonal Stag in entrance of the place you’re standing.
The Plains
![]()
![]() 1/1 Relic (Hilt of Hrotti) – Map Hyperlink
1/1 Relic (Hilt of Hrotti) – Map Hyperlink
There are three Oath Guard minibosses at The Plains. They are often discovered on non-obligatory paths. The order through which you kill them doesn’t matter, the second will at all times drop the relic.
![]()
![]() Casualties of Warfare 1/3 – Map Hyperlink
Casualties of Warfare 1/3 – Map Hyperlink
Close to the placement of Egil the Oath Guard.
![]()
![]() Odin’s Ravens 1/5 – Map Hyperlink
Odin’s Ravens 1/5 – Map Hyperlink
Throughout Brok’s Store. Flip again 180 levels, and you can see the raven standing on an enormous rock, simply in entrance of you.

![]()
![]() Lore 1/5 (Lore Marker – Seidr) – Map Hyperlink
Lore 1/5 (Lore Marker – Seidr) – Map Hyperlink
Head previous Brok’s Store, you’ll find the Lore Marker close to the Revenants, after going up the set of stairs.
![]()
![]() Yggdrasil Rift 1/3 – (+40 Mud of Realms +3 Lyndwyrm Scales, +4000 Hacksilver, Gale Spark – Weapon Improve) – Map Hyperlink
Yggdrasil Rift 1/3 – (+40 Mud of Realms +3 Lyndwyrm Scales, +4000 Hacksilver, Gale Spark – Weapon Improve) – Map Hyperlink
Previous Brok’s Store, take the steps up. You’ll encounter Revenants, defeat them and switch proper. Don’t head down simply but, maintain shifting till you discover the rift.
![]()
![]() Nornir Chest 1/2 – Map Hyperlink
Nornir Chest 1/2 – Map Hyperlink
Drop all the way down to the opposite aspect from the upper stage the place you confronted the Revenants, and switch proper. You will discover the chest there. You may see the primary bell rune on its left. The second could be discovered hidden, behind the chest, between the intersection of the wall and the small “mountain”. The third one could be discovered, previous the chest. Flip proper after you attain the small hurricane, on the sting, and you can see the rune on the next stage.


![]()
![]() Odin’s Ravens 2/5 – Map Hyperlink
Odin’s Ravens 2/5 – Map Hyperlink
When you find yourself within the space with the door that has poison fuel coming underneath it, flip again 180 levels and transfer in direction of the sting. You will note the Raven on a decrease platform, barely to the left.

![]()
![]() Odin’s Ravens 3/5 – Map Hyperlink
Odin’s Ravens 3/5 – Map Hyperlink
Take the trail between the Mystic Gateway and Brok’s Store. You will discover a chest. Persist with the left and maintain shifting till the left path reaches a column. Flip to the left and you can see the Raven there, on a crumbled huge stone that’s positioned on the decrease stage.

![]()
![]() Casualties of Warfare 2/3 (The Scroll – Gorgeous Fang) – Map Hyperlink
Casualties of Warfare 2/3 (The Scroll – Gorgeous Fang) – Map Hyperlink
Take the trail between the Mystic Gateway and Brok’s Store, and drop down on the finish. Enter the cave-like constructing and you can see a spirit that begins this favor. . To complete it, take the scroll to the realm the place you discovered the Legendary Chest surrounded by reddish timber.
![]()
![]() Odin’s Ravens 4/5 – Map Hyperlink
Odin’s Ravens 4/5 – Map Hyperlink
Go away the realm with the Mystic Gateway and Brok’s Store, and transfer in direction of the Frozen Thunder. You will note the Raven left to the thunder, standing on a stone.

![]()
![]() Epic Hunt 1/2 (Soul Eater – +10 Purified Crystalline, +100 Shattered Rune, +5 Bonded Leather-based, Eir’s Armament – Amulet Enchantment, Hunter’s Model – Useful resource) – Map Hyperlink
Epic Hunt 1/2 (Soul Eater – +10 Purified Crystalline, +100 Shattered Rune, +5 Bonded Leather-based, Eir’s Armament – Amulet Enchantment, Hunter’s Model – Useful resource) – Map Hyperlink
West of a tree between two giant rocks, camouflaged as a cluster of stones.
![]()
![]() Lore 2/5 (Lore Marker – Apology) – Map Hyperlink
Lore 2/5 (Lore Marker – Apology) – Map Hyperlink
Subsequent to a gate’s arch, in a spot infested with Seior enemies. Identical location because the Nornir Chest.
![]()
![]() Nornir Chest 2/2 –Map Hyperlink
Nornir Chest 2/2 –Map Hyperlink
Subsequent to a gate’s arch, in a spot infested with Seior enemies. Identical location because the Lore Marker. One system is across the tree behind the Nornir Chest. Should deactivate the noxious mist first. Second one is on high of one of many rocks west of the chest. The final one is inside a big crack on a tree south-east of the Nornir Chest.


![]()
![]() Legendary Chest 1/1 (Honour of the Fallen – Heavy Runic Assault) – Map Hyperlink
Legendary Chest 1/1 (Honour of the Fallen – Heavy Runic Assault) – Map Hyperlink
Subsequent to the Mystic Gateway there’s a glowing rock. Throw your spear at its again. Then climb down till you attain the purple chest and throw one other 2 spears on the entrance of the rocks. Now you can detonate all 3 spots on the similar time. Then you may the legendary chest.
![]()
![]() Lore 3/5 (Lore Marker – Stupidity): Undergo the tunnel – Map Hyperlink
Lore 3/5 (Lore Marker – Stupidity): Undergo the tunnel – Map Hyperlink
Carry the gate you’ll find subsequent to the place you defeated Dreki Dragon and go throughout the tunnel. Then go forward and take the primary boat you may. Head again to the beginning of the Dreki space. When you get there, climb up the left wall till you attain a Pink Chest. Drop down utilizing the rope. When you land on the correct hill you’ll find one other Lore Marker.
![]()
![]() Lore 4/5 (The Misplaced Pages) – Map Hyperlink
Lore 4/5 (The Misplaced Pages) – Map Hyperlink
After the earlier Seasonal Stag, take the trail in your left till you attain the hall the place you may get The Misplaced Pages.
![]()
![]() Lore 5/5 (Treasure Map – A Scar is Born) – Map Hyperlink
Lore 5/5 (Treasure Map – A Scar is Born) – Map Hyperlink
Could be discovered on the identical island because the earlier Yggdrasil Rift.
![]()
![]() Buried Treasure (Treasure Map – A Scar is Born) – Map Hyperlink
Buried Treasure (Treasure Map – A Scar is Born) – Map Hyperlink
Heading to The Skinholes space, undergo the archway the place you may collect this treasur
![]()
![]() Odin’s Ravens 5/5 – Map Hyperlink
Odin’s Ravens 5/5 – Map Hyperlink
Take the boat and head to the north east space of the lake. Then, search for the Blacksmith, throughout him you’ll find a brand new Raven on a cliff.

![]()
![]() Yggdrasil Rift 2/3 (Lindwyrm) – Map Hyperlink
Yggdrasil Rift 2/3 (Lindwyrm) – Map Hyperlink
On the location the place you combat The Crimson Dread, subsequent to the north gate.
![]()
![]() Yggdrasil Rift 3/3 – Map Hyperlink
Yggdrasil Rift 3/3 – Map Hyperlink
From the Mystic Gateway return the place you defeated the dragon. As you climb down you may get the Yggdrasil Rift.
![]()
![]() Draugr Holes 1/1 – Map Hyperlink
Draugr Holes 1/1 – Map Hyperlink
Take the canoe to get to the northeast lake space. Then go to the north dock the place you may get this Draugr Gap.
![]()
![]() Dragon Hunts 1/2 – Map Hyperlink
Dragon Hunts 1/2 – Map Hyperlink
Take the boat and head to the southwest dock. Get all the way down to the outlet to defeat Dreki Dragon.
![]()
![]() Dragon Hunts 2/2 – Map Hyperlink
Dragon Hunts 2/2 – Map Hyperlink
You will discover this dragon after defeating the Oat Guard. Go throughout the hole to get to the Dragon. After defeating it, work together with Birgir and the Mystic Gateway to finish the Dragon Hunt.
![]()
![]() Epic Hunts 1/2 (Nocturnal Predator) – Map Hyperlink
Epic Hunts 1/2 (Nocturnal Predator) – Map Hyperlink
Subsequent to the Nornir Chest, use Chaos Blades to free the three animals trapped. Later, work together with the platform so the Phantom enemy will seem. To defeat him, you have to take down 5 totems. 4 of them could be simply noticed from the middle of the realm, and the final one could be discovered within the north space throughout the river.
![]()
![]() Epic Hunts 2/2 (Favor: In Plain Sight) – Map Hyperlink
Epic Hunts 2/2 (Favor: In Plain Sight) – Map Hyperlink
From the final Lore Marker, go down and verify two of the animal carcasses. After that, you have to assault the rock within the center to get up the Soul Eater mini-boss.
![]()
![]() Casualties of Warfare 3/3 – ???
Casualties of Warfare 3/3 – ???
Identical location than the Legendary Chest
![]()
![]() Seasonal Stags 1/2 – ???
Seasonal Stags 1/2 – ???
It may be discovered subsequent to the Mystic Gateway on the left.
![]()
![]() Seasonal Stags 2/2 – ???
Seasonal Stags 2/2 – ???
Take the canoe to return into The Jungle. Use the chain near the Mystic Gateway to open the gate . Go forward till you get to the “The Wishing Effectively” space the place you may get the Stag.
The Sinkholes
![]()
![]() Nornir Chest ½ – Map Hyperlink
Nornir Chest ½ – Map Hyperlink
All units should be activated with Sigil Arrows. The primary system is on a small rock ledge simply north of the chest’s location. The second is south of the chest’s location, exterior the opening the place Kratos, Mimir and Atreus discover the tremors. The final one is on a small ledge above the south exterior wall from the realm the place the chest is positioned. Climb the marked ledge reverse to it and use Sigil Arrows to activate.


![]()
![]() Lore Marker 1/1 (Lore Marker – Every little thing Ends) – Map Hyperlink
Lore Marker 1/1 (Lore Marker – Every little thing Ends) – Map Hyperlink
On the aspect of the river with varied enemies, reverse to the one with the Mystic Gateway, and the place you communicate to Conceited Squirrel.
![]()
![]() Artifact 1/1 (Kvasir’s Poems – Jap Spectre) – Map Hyperlink
Artifact 1/1 (Kvasir’s Poems – Jap Spectre) – Map Hyperlink
From the placement the place you combat Crag Jaw, head to the west wall the place you’ll discover a slender opening you may undergo. Go up the close by stairs and also you’ll discover a corpse holding the poem in entrance of a standard chest.
![]()
![]() Berserker Headstone 1/1 (Chaos Flame) – Map Hyperlink
Berserker Headstone 1/1 (Chaos Flame) – Map Hyperlink
On the opposite aspect of the river, the place you first combat the dragon.
![]()
![]() 9 Realms in Bloom in Bloom 1/1 – Map Hyperlink
9 Realms in Bloom in Bloom 1/1 – Map Hyperlink
On the opposite aspect of the river the place you first combat the dragon, subsequent to the south-west wall.
![]()
![]() Odin’s Raven 1/1 – Map Hyperlink
Odin’s Raven 1/1 – Map Hyperlink
On high of a rock ledge throughout the river from the entry to the cave resulting in The Ash Tyrant

![]()
![]() Nornir Chest 2/2 – Map Hyperlink
Nornir Chest 2/2 – Map Hyperlink
All three units should be set concurrently by utilizing the spear and triggering it. The primary system is on high of a column west of the chest’s location. The second is southeast of the chest, on a ledge within the nook of a giant pillar. The final one is north of the chest, on high of some rocks.


![]()
![]() Dragon Hunt 2/2 The Ash Tyrant (Seal of Runic Storm – Enchantment) – Map Hyperlink
Dragon Hunt 2/2 The Ash Tyrant (Seal of Runic Storm – Enchantment) – Map Hyperlink
Climb by means of the pillar the place the second system to open the Nornir Chest is positioned.
![]()
![]() Dragon Hunts 1/2 – Map Hyperlink
Dragon Hunts 1/2 – Map Hyperlink
Burn the vines on the cave ceiling, cross the hole and drop close to the tip. Head proper and undergo the tunnel. You will discover the Dragon.
![]()
![]() Casualties of Warfare 1/1 – Map Hyperlink
Casualties of Warfare 1/1 – Map Hyperlink
Head to the gate reverse to the place you pulled the chains. Destroy the glowing rocks utilizing the Draupnir Spear, by exploding them on the similar time. Head to the tip of the tunnel, to seek out extra rocks to destroy. Choose up the merchandise that you just discover on the finish.
![]()
![]() Seasonal Stag 1/1 – Map Hyperlink
Seasonal Stag 1/1 – Map Hyperlink
From the Lore Marker location, swing throughout the river to seek out the stag. You will need to word that it’s important to discuss to Ratatoskr to obtain the Yggdrasil Leaves earlier than with the ability to work together with the Stag.
The Southern Wilds
![]()
![]() Odin’s Raven 1/1 – Map Hyperlink
Odin’s Raven 1/1 – Map Hyperlink
Upon first coming into The Southern Wilds by means of the Mystic Gateway, head North into the primary space and switch West after reaching the leaning tree within the heart. Go throughout a set of stairs underneath an arch product of roots that leads you to the riverside. Odin’s Raven might be circling above the river.

![]()
![]() Legendary Chest 1/1 (Wrath of the Frost Historical – Mild Runic Assault) – Map Hyperlink
Legendary Chest 1/1 (Wrath of the Frost Historical – Mild Runic Assault) – Map Hyperlink
After opening the metallic gate, observe the linear path till you attain the primary open space. Go to the Northmost wall and switch East. Earlier than going any additional, flip again North. You’ll discover a gap within the wall subsequent to some huge roots, cross it to get to the Legendary Chest.

![]()
![]() Artifact 1/1 (Kvasir’s Poems -The Dawn of Nothingness) Map Hyperlink
Artifact 1/1 (Kvasir’s Poems -The Dawn of Nothingness) Map Hyperlink
Kvasir’s Poem is hid underneath a concrete plate on the ground. As a way to break it, head south and switch left (east) as you observe the linear path. You’ll attain a lifeless warrior going through some climbable buildings that can take you thru a freeway that ultimately forces you to show both left or proper. Take the trail on the left (south) till you attain the tip of it. Soar to the construction to your left (east) and launch the Iron system hanging from it. Now you can use the blades to hook into the stone plate beneath and smash by means of it, supplying you with entry to Kvasir’s Poem.
![]()
![]() Nornir Chest 1/1 – Map Hyperlink
Nornir Chest 1/1 – Map Hyperlink
From the realm the place the beasts abused you, head north by means of the primary route. Cross underneath the big tree roots to the west and proceed till you discover the Nornir Chest subsequent to a big tree. As a way to open it you have to accurately set 3 close by units to show the letters proven on the chest, by smashing the circle items on every one together with your Axe till the correct letter is displayed.The primary one is positioned instantly to the correct (east) when going through the chest, on high of a giant rock. Set the blue vines/roots defending it on fireplace together with your blades and match the one on the chest. The second is atop a rock ledge precisely left (southwest) to the chest. The third one is going through the chest (southeast), on high of a rock and subsequent to a tree within the path from which you got here from. This system can be lined in blue vines, which go across the tree. Going through the system, set the blue vines on fireplace from the left aspect of the tree after which set the proper letter.


![]()
![]() Hel Tears 1/1 – Map Hyperlink
Hel Tears 1/1 – Map Hyperlink
Arriving from The Southern Wilds Mystic Gateway, you’ll find this merchandise on the correct aspect. You gained’t see it the primary time you get right here, as you have to be extra superior within the recreation story.
The Veiled Passage
![]()
![]() Nornir Chest 1/1 – Map Hyperlink
Nornir Chest 1/1 – Map Hyperlink
When you enter The Veiled Passage, land on the shore to your proper (east). Use the flaming vase-like recipient to clear the trail subsequent to it and advance to the chest. To entry The Veiled Passage you have to disengage the magic sealed wall by making Freya learn the runic phrases. When you land on the shore exterior Cliffside Ruins, head straight south till you attain the rock wall, subsequent to the spot the place Gunhild seems to ask for a favor. Use the chain hanging from the rocks to climb to a small space the place you’ll discover the system for Freya’s rune learn. As a way to open the chest you could destroy the hanging units throughout the river in a brief time frame, in any other case the counter on the chest will reset. To attain this, use Freya’s Sigil bridging the house between them and throw one of many projectiles from the flaming recipient in direction of them.

![]()
![]() Artifact 1/1 (Household Crests – Kvasir’s Crest) – Map Hyperlink
Artifact 1/1 (Household Crests – Kvasir’s Crest) – Map Hyperlink
When you attain the shore with the three skeletons hanging from above, break the picket gate to your left (west) and climb the south wall. Flip proper to the open-ended cave with the 2 Reavers. Go proper (north) and observe the trail to the subsequent part the place you’ll discover extra Reavers. Destroy the picket construction to disclose the artifact.
![]()
![]() Lore 1/1 (
Lore 1/1 (![]()
![]() Lore Marker – Seidr Sacrifice) – Map Hyperlink
Lore Marker – Seidr Sacrifice) – Map Hyperlink
When you attain the shore with the three skeletons hanging from above, break the picket gate to your left (west) and climb the south wall. The marker is in your proper when you attain the highest. To entry The Veiled Passage you have to disengage the magic sealed wall by making Freya learn the runic phrases. When you land on the shore exterior Cliffside Ruins, head straight south till you attain the rock wall, subsequent to the spot the place Gunhild seems to ask for a favor. Use the chain hanging from the rocks to climb to a small space the place you’ll discover the system for Freya’s rune learn.
![]()
![]() Odin’s Raven 1/1 – Map Hyperlink
Odin’s Raven 1/1 – Map Hyperlink
When you attain the shore with the three skeletons hanging from above, face south-west to the higher aspect of the cave. The raven is standing on a department

Vanir Shrine
![]()
![]() Lore 1/7 (Lore Marker – The Feast) – Map Hyperlink
Lore 1/7 (Lore Marker – The Feast) – Map Hyperlink
Within the space the place you face Soul Eater, on the wall reverse the Orange Chest behind a column, you can see a Lore Marker
![]()
![]() Lore 2/7 (Treasure Map – The Large’s Toes) – Map Hyperlink
Lore 2/7 (Treasure Map – The Large’s Toes) – Map Hyperlink
From the earlier Lore Maker, head to the correct wall the place you may decide up a Treasure Map from the bottom.
![]()
![]() Lore 3/7 ( Rune Reads – Traitor) – Map Hyperlink
Lore 3/7 ( Rune Reads – Traitor) – Map Hyperlink
Discovered on a wall exterior a runed temple in Vanir Shine
![]()
![]() Lore 4/7 (Lore Maker – The Blessing of Two) – Map Hyperlink
Lore 4/7 (Lore Maker – The Blessing of Two) – Map Hyperlink
From Traitor Rune Reads, observe the trail by means of the ruined gates. Go previous the primary column then flip left to seek out The Blessing of Two Lore marker
![]()
![]() Lore 5/7 (Lore Marker – The Auburn Crown) – Map Hyperlink
Lore 5/7 (Lore Marker – The Auburn Crown) – Map Hyperlink
After the earlier Lore Marker, observe the trail till you attain an space with 3 flying jellyfish. On the left-hand aspect you can see a brand new The Auburn Crown Lore Marker
![]()
![]() Artifact 1/1 (Household Crests – Hylli’s Crest) – Map Hyperlink
Artifact 1/1 (Household Crests – Hylli’s Crest) – Map Hyperlink
After the earlier Lore Marker, flip proper and after defeating the wolves you may decide up a Household Crest artifact from the bottom.
![]()
![]() Legendary Chest 1/1 (Rampage of the Furies – Mild Runic Assault) – Map Hyperlink
Legendary Chest 1/1 (Rampage of the Furies – Mild Runic Assault) – Map Hyperlink
On the wall reverse the final Lore Marker, you’ll see a locked door that you could’t raise and a chest behind it. To open it you could observe the trail till you discover a door. Method the door and push it up. Instantly to your proper you will note some logs on the wall that you could burn. By the outlet you may throw your axe to activate a mechanism. Return to the door that was closed, now you can see it open. Defeat the enemy after which you may entry a Legendary Chest.


![]()
![]() Lore 6/7 (Lore Scroll – Deserted) – Map Hyperlink
Lore 6/7 (Lore Scroll – Deserted) – Map Hyperlink
After the earlier Legendary Chest, proceed your Quest till you attain a sort of bridge that Freya permits for each of you. You may then decide up a Scroll from a corpse on the opposite aspect earlier than opening the door.
![]()
![]() Lore 7/7 (Lore Marker – The Ceremony) – Map Hyperlink
Lore 7/7 (Lore Marker – The Ceremony) – Map Hyperlink
After Freya will get Mardol’s sword, you’ll find The Ceremony Lore marker to the correct of the door forward of you.
![]()
![]() River Delta Favors 1/1 – Map Hyperlink
River Delta Favors 1/1 – Map Hyperlink
Proper after you discover The Ceremony Lore Marker, return to the seashore of Goddess Falls. There might be a boss combat, after it get again to the boat. As quickly as you do, the Favor might be accomplished.
Western Barri Woods:
![]()
![]() 1/2 Relic (Hilt of Hofud) – Map Hyperlink
1/2 Relic (Hilt of Hofud) – Map Hyperlink
Dropped by Heimdall on the finish of the primary story Quest: Creatures of Prophecy
![]()
![]() 2/2 Relic (Glaive of Dodher) – Map Hyperlink
2/2 Relic (Glaive of Dodher) – Map Hyperlink
Dropped by Friske upon defeat.
![]()
![]() Lore 1/1 (Lore Marker – Concord) – Map Hyperlink
Lore 1/1 (Lore Marker – Concord) – Map Hyperlink
Discovered proper after the cinematic through which Kratos tells Freya the Giants rescued Sköll and Hati from Odin and introduced them to Vanaheim. Comply with the sting of the cliff to your proper to seek out the marker.
![]()
![]() Scent of Survival 1/1 – Map Hyperlink
Scent of Survival 1/1 – Map Hyperlink
It’s essential full the Favor: Scent of Survival.
Alfheim
Temple of Mild
![]()
![]() Lore 1/2 (Scroll – The Bifrost Bridge) – Map Hyperlink
Lore 1/2 (Scroll – The Bifrost Bridge) – Map Hyperlink
As you’re climbing the ladder, flip to your left and drop down. Tyr will point out one thing about heading on the improper method, however Atreus will point out that Kratos likes to be thorough. Struggle some Wretches, and take the left path. The scroll is subsequent to the lifeless physique.
![]()
![]() Legendary Chest 1/3 (Hades Retribution – Mild Ruinic Assault) – Map Hyperlink
Legendary Chest 1/3 (Hades Retribution – Mild Ruinic Assault) – Map Hyperlink
You will discover the Legendary Chest, just under the realm the place you discovered the final scroll. On the aspect of the stroll, you’ll find a gap, from which you’ll drop all the way down to the decrease stage. As soon as there, flip to your left to seek out the chest.


![]()
![]() Odin’s Ravens (1/2) – Map Hyperlink
Odin’s Ravens (1/2) – Map Hyperlink
Whenever you drop down from the steps, you’ll discover a trapped Raven. As a way to attain it, it’s important to throw your axe to the Twilight Stone, in a method that it manages to bounce on the one discovered within the room with the Raven, to have the ability to hit it. The arc will flip blue when the axe is on the right track to hit the opposite stone, so this may show you how to enhance your intention.

![]()
![]() Artifact 1/2 (Kvasir’s Poems – Visions after Relaxation) – Map Hyperlink
Artifact 1/2 (Kvasir’s Poems – Visions after Relaxation) – Map Hyperlink
When you attain the room with the hanging Twilight Stone on the correct. Flip proper and use the Blades of Chaos to climb to the higher stage. As soon as you’re up, flip left and transfer till the tip of the trail to seek out the artifact on the ground.
![]()
![]() Legendary Chest 2/3 (Hilt of Gram – Relic) – Map Hyperlink
Legendary Chest 2/3 (Hilt of Gram – Relic) – Map Hyperlink
When you find yourself within the room through which it’s important to use the wheel to place the twilight stone. On the correct of the wheel, you’ll find a round golden door, open it to achieve the realm the place the chest is. As a way to receive the chest it’s important to remedy a puzzle. You must use the Axe in order that it bounces on the stone and cuts the chain of the elevator. Use the chain to maneuver the Twilight Stone all the best way up, and from that place throw the axe in a method that it hits the white marble. Discover the blue arc. Launch the chain, and as soon as the elevator is once more in its authentic place, name again your axe. You probably have performed it accurately, you’ll minimize the rope and the chest might be ready for you on the decrease stage.


![]()
![]() 1/1 Relic (Hilt of Gram) – Map Hyperlink
1/1 Relic (Hilt of Gram) – Map Hyperlink
Could be discovered on a Legendary Chest in Alfheim. Gamers can first receive the Hilt of Gram whereas finishing Groa’s Secret.
![]()
![]() Artifact 2/2 (Kvasir’s Poems – Spirits Inside Partitions) – Map Hyperlink
Artifact 2/2 (Kvasir’s Poems – Spirits Inside Partitions) – Map Hyperlink
After you full the hanging twilight stone puzzle and face the Exploding Nightmares. Take the left path and you can see the artifact on a spherical desk, in the course of the room.
![]()
![]() Legendary Chest 3/3 (Rune-Engraved Launch – Accesory) – Map Hyperlink
Legendary Chest 3/3 (Rune-Engraved Launch – Accesory) – Map Hyperlink
Use the protect like buildings to get to the platform. From the platform, transfer the large Twilight Stone to your proper with the blades of chaos. Then Use the Leviathan Axe to bounce off the Stone and break the sunshine crystal beneath the doorway. This can unlock the sunshine door stopping you from reaching this chest.


![]()
![]() Nornir Chest 1/1 – Map Hyperlink
Nornir Chest 1/1 – Map Hyperlink
This chest has you on the lookout for 3 bell-like runes. It may be discovered after you push the elves’ statue to create a light-weight bridge. The First rune is true subsequent to it. The second could be discovered on the correct aspect of the steps, on an higher stage. The third one may also be discovered in your proper aspect, however this time, going downstairs, hit the Twilight stone that it hits the bell.


![]()
![]() Odin’s Ravens 2/2 – Map Hyperlink
Odin’s Ravens 2/2 – Map Hyperlink
After combating the Elves in a room filled with Twilight Stones, head to the steps and you will note it on the left aspect. Perched on a small balcony. Simply noticed. Go up just a few stairs to hit it together with your axe.

![]()
![]() Lore 2/2 (Rune Learn – Limitless) – Map Hyperlink
Lore 2/2 (Rune Learn – Limitless) – Map Hyperlink
As soon as you’re within the Central chamber. You’ll have to align two statues in an effort to maintain advancing. Command Atreus to shoot a Sonic Arrow to the statue on the correct in an effort to place its protect in the course of it. This can help you traverse to a different platform utilizing the Blades of Chaos. You may’t be in entrance of the statue to do that, transfer to the aspect, at first of the steps. Doing so, you’ll attain the platform that comprises this Lore piece.
The Barrens
![]()
![]() Artifact 1/3 (Tributes to Freyr – Horn) – Map Hyperlink
Artifact 1/3 (Tributes to Freyr – Horn) – Map Hyperlink
Head to the north nook into the constructing, defeat the enemies. Subsequent to the Lore Marker Stone, there’s a purple merchandise to the left. It’s a horn.
![]()
![]() Lore 1/4 (
Lore 1/4 (![]() Lore Marker – The Tower’s Objective) – Map Hyperlink
Lore Marker – The Tower’s Objective) – Map Hyperlink
North nook into the constructing, defeat the enemies. The Lore Marker Stone is seen close to the wall.
![]()
![]() Lore 2/4 (Scroll- The Misplaced Pages) – Map Hyperlink
Lore 2/4 (Scroll- The Misplaced Pages) – Map Hyperlink
North nook into the constructing, defeat the enemies. The Diagram is on the bottom subsequent to the chest on the west nook of the constructing.
![]()
![]() Legendary Chest 1/3 (Gauntlets of Radiance – Wrist Armor) – Map Hyperlink
Legendary Chest 1/3 (Gauntlets of Radiance – Wrist Armor) – Map Hyperlink
North nook into the constructing. The Chest could be discovered on the southeast nook of this platform.

![]()
![]() Buried Treasure 1/1 – Vulture’s Gold (+10 Shattered Rune, +1 Stonewood, +1 Dwarven Metal +1 Honed Steel, Deadly Detonation – Accent) – Map Hyperlink
Buried Treasure 1/1 – Vulture’s Gold (+10 Shattered Rune, +1 Stonewood, +1 Dwarven Metal +1 Honed Steel, Deadly Detonation – Accent) – Map Hyperlink
Could be discovered inside the massive dragon head. Northern a part of the area.
![]()
![]() Lore 3/4 (Lore Marker – The Desert of Our Ignorance) – Map Hyperlink
Lore 3/4 (Lore Marker – The Desert of Our Ignorance) – Map Hyperlink
Head to the Southeast nook of the sector the place you may trip the Gulon.
![]()
![]() Artifact 2/3 (Kvasir’s Poems) – Map Hyperlink
Artifact 2/3 (Kvasir’s Poems) – Map Hyperlink
Climb contained in the fossil to the west of the sandy discipline. Climb once more to the subsequent stage and observe that path. Defeat the Enemies. There’s a wall that you could climb up as soon as extra. The Poem is on the bottom.
![]()
![]() Legendary Chest 2/3 (Belt of Radiance) – Map Hyperlink
Legendary Chest 2/3 (Belt of Radiance) – Map Hyperlink
Climb contained in the fossil to the west of the sandy discipline. Climb once more to the subsequent stage and observe that path. Defeat the Enemies. There’s a wall that you could climb up as soon as extra. The Chest is true there.


![]()
![]() Lore 4/4 (Lore Marker – Gulon Cull) – Map Hyperlink
Lore 4/4 (Lore Marker – Gulon Cull) – Map Hyperlink
Head to the Southeast nook of the sector the place you may trip the Gulon.
![]()
![]() Artifact 3/3 (Tributes to Freyr – Harp) – Map Hyperlink
Artifact 3/3 (Tributes to Freyr – Harp) – Map Hyperlink
There’s a passage subsequent to the doorway to the sector the place you may trip the Gulon. It’s laborious to see it at midnight. The Harp could be discovered on the correct aspect of the small cave.
![]()
![]() Legendary Chest 3/3 (Rond of Affliction – Defend Attachment) – Map Hyperlink
Legendary Chest 3/3 (Rond of Affliction – Defend Attachment) – Map Hyperlink
There’s a passage subsequent to the doorway to the sector the place you may trip the Gulon. It’s laborious to see it at midnight. The chest is true inside. From right here you may minimize the roots, You must place your self to hit the two roots which are additional, by standing subsequent to the nearer one. The plan is to hit the nearer one with the returning movement of the axe, it’s not solely about throwing the axe the proper route, however it’s important to time the second to name the axe to you once more. In any other case, the trajectory curve might be too vast and gained’t hit the final root.


![]()
![]() Berserker Gravestones 1/1 (Chaos Spark, +2 Sovereign Coals +25 Mud of Realms) – Map Hyperlink
Berserker Gravestones 1/1 (Chaos Spark, +2 Sovereign Coals +25 Mud of Realms) – Map Hyperlink
This seems on the lava pit turned to stone on the west platform after defeating The Hateful.
![]()
![]() Odin’s Raven 1/2 – Map Hyperlink
Odin’s Raven 1/2 – Map Hyperlink
Head to the north, there’s a white synthetic constructing. Earlier than coming into there’s a tree to the left with an Odin Raven standing on it. The shot is straightforward.

![]()
![]() Nornir Chest 1/1 – Map Hyperlink
Nornir Chest 1/1 – Map Hyperlink
Head to the north, there’s a platform with a vibrant constructing lined in roots. You may minimize the roots by throwing the axe from the again.
Now it’s important to gentle the torches across the platform to unlock the chest. The primary torch is on the left from the place you threw the axe on the excessive floor. The second is true subsequent to the chest. The third one may be very excessive up over the constructing, barely seen, and also you don’t have sufficient vary to ignite it straight together with your sword-chain. You must hit the vase subsequent to it utilizing your axe to ignite the final torch.


![]()
![]() Secrets and techniques of the Sands 1/1 – Map Hyperlink
Secrets and techniques of the Sands 1/1 – Map Hyperlink
The primary a part of attempting to avoid wasting the creature is while you discover it a bit entangled by some roots that it’s important to destroy.
Destroy the barricade on the left, the vase could be seen from the sting of the autumn. Soar on the platform and hit the roots on the correct beneath, destroying the primary one and bouncing the axe to the opposite two.
Lastly, hit the Twilight Stone above you to the left, from an angle that can hit the primary root and the subsequent Twilight Stone on the similar time.
You should proceed to go as much as the floor and open the hive cage on the floor after this.
As soon as you’re on the floor, trip the Gulon and head to the purple gentle that may be seen not very far forward to the Northwest. Atreus will announce that you’re purported to be when you attain there. Work together with the hive cage and free the Hafgufa.
![]()
![]() Odin’s Ravens 2/2 – Map Hyperlink
Odin’s Ravens 2/2 – Map Hyperlink
Head to the large skeleton discovered on the NE space of the map. Enter contained in the skeleton and look by means of the cranium’s proper eye socket to seek out the Raven.

![]()
![]() Berserker Gravestones 1/1 (Asgard’s Safety – Amulet Enchantment, Frozen Flame – Weapon Improve, Berserker Cuirass – Chest Armor) – Map Hyperlink
Berserker Gravestones 1/1 (Asgard’s Safety – Amulet Enchantment, Frozen Flame – Weapon Improve, Berserker Cuirass – Chest Armor) – Map Hyperlink
Svipdagr the Chilly and Sisters of Illska. Could be discovered on the SE space of the map. Close to the Lore Marker.
![]()
![]() Remnants of Asgard 1/1 – Map Hyperlink
Remnants of Asgard 1/1 – Map Hyperlink
Journey to the Canyons Mystic Gateway, and take the sled. Head on the sled move the massive arch and keep on with the correct aspect. Finally, you’ll run right into a small ledge. Climb it to achieve the camp.
The Under
![]()
![]() Lore 1/1 (Rune Learn – Wall Artwork) – Map Hyperlink
Lore 1/1 (Rune Learn – Wall Artwork) – Map Hyperlink
After opening the trail to achieve the Chest, you will note the Wall Artwork proper subsequent to it.
![]()
![]() Legendary Chest 1/1 – Map Hyperlink
Legendary Chest 1/1 – Map Hyperlink
This Chest could be seen from the opposite aspect of a gate that may solely be opened from exterior. Proceed your quest till you attain again to this location however from the opposite aspect. As soon as you’re there, depart the gate open, then go hit the primary bell that may be discovered within the excessive floor on a round cave window. Soar down and hit the second which is true subsequent to the chest. And lastly, hit the one that’s contained in the cave by means of the opened gate.


![]()
![]() Nornir Chest 1/1 – Map Hyperlink
Nornir Chest 1/1 – Map Hyperlink
You will discover this chest, instantly after the lore, however in a locked gate. You must open the gate after which climb round to open the gate on the upper stage. Now it’s important to hit the three runes utilizing the Leviathan Axe. The runes are upstairs in a window, in entrance of the chest itself, and the final one in a tunnel subsequent to the chest.


The Burrows
![]()
![]() Lore 1/1 (Rune Learn- Sacrifice) – Map Hyperlink
Lore 1/1 (Rune Learn- Sacrifice) – Map Hyperlink
Discovered within the space the place you’ve got the massive combat.
![]()
![]() Legendary Chest 1/2 (Hel’s Contact, Mild Runic Assault) – Map Hyperlink
Legendary Chest 1/2 (Hel’s Contact, Mild Runic Assault) – Map Hyperlink
Use the Twilight stone to interrupt the impediment after which climb by means of the created path to achieve the Legendary Chest.


![]()
![]() Artifacts 1/1 (Tributes to Freyr – Pipe) – Map Hyperlink
Artifacts 1/1 (Tributes to Freyr – Pipe) – Map Hyperlink
Could be acquired by defeating all enemies.
![]()
![]() Legendary Chest 2/2 (Nemean Crush – Heavy Runic Assault) – Map Hyperlink
Legendary Chest 2/2 (Nemean Crush – Heavy Runic Assault) – Map Hyperlink
Could be present in the identical room because the artifact.
The Canyons
![]()
![]() Lore 1/2 (Vulture’s Gold – Treasure Map) – Map Hyperlink
Lore 1/2 (Vulture’s Gold – Treasure Map) – Map Hyperlink
It’s the primary merchandise that may be discovered after Tyr leaves by means of the portal. On the bottom in the course of the best way, subsequent to a few lifeless our bodies.
![]()
![]() Odin’s Ravens 1 /1 – Map Hyperlink
Odin’s Ravens 1 /1 – Map Hyperlink
It’s first seen flying up excessive proper after discovering The Canyons, however the shot turns into a lot simpler after you climb up, proceed your strategy to the left, then climp up. The Raven flies a lot nearer to you from there.

![]()
![]() Lore 2/2 (Lore Marker – U-Natur-Liker) – Map Hyperlink
Lore 2/2 (Lore Marker – U-Natur-Liker) – Map Hyperlink
Subsequent to Sindri’s camp, it’s very laborious to overlook.
The Forbidden Sands
![]()
![]() 1/1 Relic (Hilt of Angrvadall) – Map Hyperlink
1/1 Relic (Hilt of Angrvadall) – Map Hyperlink
On the finish of The Desert Door favor, gamers will face Gravel Stomach. It drops Skirnir’s Gambanteinn as soon as defeated. It may be used to craft this hilt.
![]()
![]() Odin’s Ravens 1/4 – Map Hyperlink
Odin’s Ravens 1/4 – Map Hyperlink
Discovered circling close to the massive statue.

![]()
![]() Odin’s Ravens 2/4 – Map Hyperlink
Odin’s Ravens 2/4 – Map Hyperlink
A raven could be discovered on one of many rocks close to the Mild Elf Statue

![]()
![]() Artifact 1/3 (Kvasir’s Poems ) – Map Hyperlink
Artifact 1/3 (Kvasir’s Poems ) – Map Hyperlink
Could be discovered contained in the small white stone tower
![]()
![]() Berserker Headstone 1/1 (+3 Tempered Remnants, +40 Shattered Rune, +40 Bonded Leather-based, Grip of the 9 Realms in Bloom – Axe Attachment):
Berserker Headstone 1/1 (+3 Tempered Remnants, +40 Shattered Rune, +40 Bonded Leather-based, Grip of the 9 Realms in Bloom – Axe Attachment):
Use the Berserker Headstone to summon Hjalti The Stolid
![]()
![]() Legendary Chest 1/2 (Hardened Warfare Handles – Blades Attachment) – Map Hyperlink
Legendary Chest 1/2 (Hardened Warfare Handles – Blades Attachment) – Map Hyperlink
Destroy the roots which are blocking the best way to the chest


![]()
![]() Nornir Chest 1/2 (Svartalfheim’s Fortitude – Amulet Enchantment, +10 Shattered Rune) – Map Hyperlink
Nornir Chest 1/2 (Svartalfheim’s Fortitude – Amulet Enchantment, +10 Shattered Rune) – Map Hyperlink
Use the Sigil Arrows to ignite the primary vessel with the rune. The second Rune is subsequent to the Chest, and The third rune is behind the pillar.


![]()
![]() Odin’s Ravens 3/4 – Map Hyperlink
Odin’s Ravens 3/4 – Map Hyperlink
The raven is close to one of many Runes.

![]()
![]() 9 Realms in Bloom in Bloom 1/1 (Dawnbloom) – Map Hyperlink
9 Realms in Bloom in Bloom 1/1 (Dawnbloom) – Map Hyperlink
It’s subsequent to the tombstone. Kill the enemies.
![]()
![]() Lore 1/7 (Lore Marker – Bjarg Stormr) – Map Hyperlink
Lore 1/7 (Lore Marker – Bjarg Stormr) – Map Hyperlink
Go to the place the raven was and you can see a tombstone
![]()
![]() Lore 2/7 (Lore Marker – The Enlightened One) – Map Hyperlink
Lore 2/7 (Lore Marker – The Enlightened One) – Map Hyperlink
Use the crystals to gentle up the Frey’s Monument necklace. The stone tombstone will gentle up and it is possible for you to to learn its message
![]()
![]() Freyr’s Reward 1/1 (Inkoke the Storm – Runic Summon, +1 Folkvangr Whetstone, +13 Whispering Slab) – Map Hyperlink
Freyr’s Reward 1/1 (Inkoke the Storm – Runic Summon, +1 Folkvangr Whetstone, +13 Whispering Slab) – Map Hyperlink
Full the Freyr’s Reward Favor, utilizing the crystals on the earlier puzzle and seize the merchandise.
![]()
![]() Artifact 2/3 (Tributes to Freyr – Token) – Map Hyperlink
Artifact 2/3 (Tributes to Freyr – Token) – Map Hyperlink
Previous the door that has two locks. Squeeze by means of the hole to achieve this space.
![]()
![]() Yggdrasil Rift 1/1 (+10 Mud of Realms, +2 Stonewood, +2 Dwarven Metal, +2 Hone Steel, +750 Hacksilver) – Map Hyperlink
Yggdrasil Rift 1/1 (+10 Mud of Realms, +2 Stonewood, +2 Dwarven Metal, +2 Hone Steel, +750 Hacksilver) – Map Hyperlink
Close to the placement of the earlier artifact, previous the door that has two locks. Squeeze by means of the hole to achieve this space.
![]()
![]() Artifact 3/3 (Tributes to Freyr – Bracelet) – Map Hyperlink
Artifact 3/3 (Tributes to Freyr – Bracelet) – Map Hyperlink
It may be discovered close to the door that wants two keys to open.
![]()
![]() Lore 3/7 (Scroll – An Examination of Temporal Significance) – Map Hyperlink
Lore 3/7 (Scroll – An Examination of Temporal Significance) – Map Hyperlink
Could be discovered at The Elven Sanctum, contained in the Elven Library. On one of many tables.
![]()
![]() Lore 4/7 (Lore Marker -Guidelines of the Sanctum) – Map Hyperlink
Lore 4/7 (Lore Marker -Guidelines of the Sanctum) – Map Hyperlink
The Tombstone is contained in the Elven Library.
![]()
![]() Lore 5/7 (Treasure Map – Forgotten Tower) – Map Hyperlink
Lore 5/7 (Treasure Map – Forgotten Tower) – Map Hyperlink
To seek out the Map, climb the stone wall yet another stage.
![]()
![]() Legendary Chest 2/2 (Jewel of Yggdrasil – Amulet Fragment) – Map Hyperlink
Legendary Chest 2/2 (Jewel of Yggdrasil – Amulet Fragment) – Map Hyperlink
The chest is in entrance of you, subsequent to a purple chest


![]()
![]() The Elven Sanctum 1/1 (Consul’s Journal) – Map Hyperlink
The Elven Sanctum 1/1 (Consul’s Journal) – Map Hyperlink
Could be discovered on the white and gold lectern. You’ll have to face the Maven inside one other room. After leaving the Sanctum, the hunt might be accomplished.
![]()
![]() Lore 6/7 (Lore Marker – The Arbiters of Data) – Map Hyperlink
Lore 6/7 (Lore Marker – The Arbiters of Data) – Map Hyperlink
Comply with the trail, and ultimately you can see it
![]()
![]() The Desert Door 1/1 (+2 Dragon Tooth, +1 Dragon Claw, Alfheim’s Fortune – Amulet Enchantment, Skirnir’s Gambanteinn – Useful resource) – Map Hyperlink
The Desert Door 1/1 (+2 Dragon Tooth, +1 Dragon Claw, Alfheim’s Fortune – Amulet Enchantment, Skirnir’s Gambanteinn – Useful resource) – Map Hyperlink
You will discover the First half exterior the Elven Library within the southwestern space of the map, this may begin the Favor. Journey south-east from there, and you can see the opposite half. Head again to the door. Open it to face Gravel Stomach. Defeat it.
![]()
![]() Buried Treasure 1/1 (+10 Shattered Rune, +1 Stonewood, +1 Dwarven Metal, +1 Honed Steel, Alfheim’s Advantage – Amulet Enchantment) – Map Hyperlink
Buried Treasure 1/1 (+10 Shattered Rune, +1 Stonewood, +1 Dwarven Metal, +1 Honed Steel, Alfheim’s Advantage – Amulet Enchantment) – Map Hyperlink
Could be discovered close to the Massive Closed Door.
![]()
![]() Lore 7/7 (Scroll- The Misplaced Pages) – Map Hyperlink
Lore 7/7 (Scroll- The Misplaced Pages) – Map Hyperlink
Could be discovered on a desk contained in the Elven Library.
![]()
![]() Odin’s Ravens 4/4 – Map Hyperlink
Odin’s Ravens 4/4 – Map Hyperlink
The platform that accesses the Elven Library has a gap proper on the base. Enter the outlet and you will note the raven in entrance of you

![]()
![]() Nornir Chest 2/2 (+10 Shattered Rune, Alfheim’s Justice – Amulet Enchantment) – Map Hyperlink
Nornir Chest 2/2 (+10 Shattered Rune, Alfheim’s Justice – Amulet Enchantment) – Map Hyperlink
The chest might be in the course of the underground room. Throw your axe to chop all of the roots. Ignite the primary rune to your left. The second rune is on the alternative aspect. And the third rune is behind a hidden wall. Simply above the earlier Rune. Use the Sonic Arrows to open the wall.


![]()
![]() Music of the Sands – Map Hyperlink
Music of the Sands – Map Hyperlink
You’ll mechanically begin this Favor by traversing The Burrows, You must free the massive flying jellyfish-like creature. When you get again as much as the desert, simply minimize the creature unfastened to complete the favor.
The Strond
![]()
![]() Lore (1/2) – Rune Learn – Damaged Historical past – Map Hyperlink
Lore (1/2) – Rune Learn – Damaged Historical past – Map Hyperlink
As quickly as you arrive, barely to your left, there’s a Rune Learn.
![]()
![]() Nornir Chest 1/2 – Map Hyperlink
Nornir Chest 1/2 – Map Hyperlink
Drop down the sting in your left aspect. Simply after squeezing by means of the hole. You will discover a Nornir Chest there. The primary rune could be discovered simply behind you, use the Blades of Chaos to ignite it. Transfer ahead till the tip and switch left, look all the way down to see it on a barely decrease stage than yours. Once more, use the blades to ignite it. For the third one, you’ll have to get to the next place. Climb the 2 ledges and switch left. Look down to seek out the third rune. Use the Blades of Chaos to ignite it.


![]()
![]() Lore 2/2 (Lore Marker – The Dwelling Desert) – Map Hyperlink
Lore 2/2 (Lore Marker – The Dwelling Desert) – Map Hyperlink
Earlier than the small hole the place Kratos has to squeeze to move by means of, flip left and drop down. You will discover a Lore Marker there.
![]()
![]() Odin’s Ravens 1/1 – Map Hyperlink
Odin’s Ravens 1/1 – Map Hyperlink
Could be discovered on a tree’s department. Unattainable to overlook, it’s on the aspect of the primary highway.

![]()
![]() Artifact 1/2 (Kvasir’s Poems – Afterlife Abandonment) – Map Hyperlink
Artifact 1/2 (Kvasir’s Poems – Afterlife Abandonment) – Map Hyperlink
Discovered within the room with the
![]()
![]() Legendary Chest. After the primary time you discover Twilight Stone, destroy the barricade and transfer ahead till you fall to a decrease stage. On the decrease stage, flip left and head ahead. Destroy some jars to enter the realm, and switch left to seek out the poem alongside the Legendary Chest.
Legendary Chest. After the primary time you discover Twilight Stone, destroy the barricade and transfer ahead till you fall to a decrease stage. On the decrease stage, flip left and head ahead. Destroy some jars to enter the realm, and switch left to seek out the poem alongside the Legendary Chest.
![]()
![]() Legendary Chest 1/1 (Skadi’s Edge – Mild Runic Assault) – Map Hyperlink
Legendary Chest 1/1 (Skadi’s Edge – Mild Runic Assault) – Map Hyperlink
After the primary time you discover Twilight Stone, destroy the barricade and transfer ahead till you fall to a decrease stage. On the decrease stage, flip left and head ahead. Destroy some jars to enter the realm, and switch left to seek out the poem alongside the Legendary Chest.


![]()
![]() Artifact 2/2 (Tributes To Freyr – Dream Appeal) – Map Hyperlink
Artifact 2/2 (Tributes To Freyr – Dream Appeal) – Map Hyperlink
Discovered to the correct, close to a Nornir Chest. Proper after lifting a heavy rock to grant passage to you and your companions.
![]()
![]() Hel Tears 1/1 (Frozen Spark, +3 Essence of Hel, +60 Mud of Realms, +5000 Hascksilver) – Map Hyperlink
Hel Tears 1/1 (Frozen Spark, +3 Essence of Hel, +60 Mud of Realms, +5000 Hascksilver) – Map Hyperlink
From the Strond Mystic Gateway, journey to the south gate. Out of your place, you will note the Hel Tear, on the decrease stage. Drop all the way down to activate it.
![]()
![]() Remnant of Asgard 1/1 (+3 Tempered Remnants, +50000 Hacksilver) – Map Hyperlink
Remnant of Asgard 1/1 (+3 Tempered Remnants, +50000 Hacksilver) – Map Hyperlink
Head by means of the cave through which you’ve got used the Twilight Stone for the primary time. Proceed ahead and switch proper till you discover a climbable wall. Transfer ahead to face the enemies. Loot the purple chest
![]()
![]() Nornir Chest 2/2 (Midgard’s Bravery – Amulet Enchantment, +10 Shattered Rune) – Map Hyperlink
Nornir Chest 2/2 (Midgard’s Bravery – Amulet Enchantment, +10 Shattered Rune) – Map Hyperlink
Carry the heavy stone in the best way, and you can see the chest close to you. You will discover one rune close to the massive tree in entrance of the chest. One other one close to the left aspect of the chest. To entry the third one, break the rock on the aspect utilizing the Draupnir Spear, and previous the Mystic Gateway you can see the Rune.


Niflheim
Mist Fields
![]()
![]() 9 Realms in Bloom in Bloom – Map Hyperlink
9 Realms in Bloom in Bloom – Map Hyperlink
You may get it as you get out of the Mystic Gateway
![]()
![]() Berserker Gravestones 1/1 – Map Hyperlink
Berserker Gravestones 1/1 – Map Hyperlink
As you proceed down the trail you can see it within the heart of the trail.
The Raven Tree
![]()
![]() 1/1 Relic (Hilt of Forsbandr) –Map Hyperlink
1/1 Relic (Hilt of Forsbandr) –Map Hyperlink
It is possible for you to to open the 6 legendary chests close to the treeafter discovering all 48 Odin’s Ravens all through the sport. When you achieve this, The Raven Tree will spawn. Comply with him down the hill, and defeat him to acquire the Relic
![]()
![]() The Eyes of Odin 1/1 – Map Hyperlink
The Eyes of Odin 1/1 – Map Hyperlink
After getting opened all 6 Legendary Chests, The Raven Keeper Boss will seem. It’s essential observe him and defeat him.
![]()
![]() Legendary Chests 1/6 (Girdle of the Raven Tears – Waist Armor) – Map Hyperlink
Legendary Chests 1/6 (Girdle of the Raven Tears – Waist Armor) – Map Hyperlink
It’s essential open the primary chest underneath the Raven Tree. Requires having discovered 6 Odin’s Ravens to open.
![]()
![]() Legendary Chests 2/6 (Bracers of Raven Tears – Wrist Armor) – Map Hyperlink
Legendary Chests 2/6 (Bracers of Raven Tears – Wrist Armor) – Map Hyperlink
It’s essential open the second chest underneath the Raven Tree. Requires having discovered 12 Odin’s Ravens to open.
![]()
![]() Legendary Chests 3/6 (Cuirass of Raven Tears – Chest Armor) – Map Hyperlink
Legendary Chests 3/6 (Cuirass of Raven Tears – Chest Armor) – Map Hyperlink
It’s essential open the third chest underneath the Raven Tree. Requires having discovered 18 Odin’s Ravens to open
![]()
![]() Legendary Chests 4/6 (Breath of Thamur – Heavy Runic Assault) – Map Hyperlink
Legendary Chests 4/6 (Breath of Thamur – Heavy Runic Assault) – Map Hyperlink
It’s essential open the fourth chest underneath the Raven Tree. Requires having discovered 28 Odin’s Ravens to open.
![]()
![]() Legendary Chests 5/6 (Meteoric Slam – Heavy Runic Assault) – Map Hyperlink
Legendary Chests 5/6 (Meteoric Slam – Heavy Runic Assault) – Map Hyperlink
It’s essential open the fifth chest underneath the Raven Tree. Requires having discovered 38 Odin’s Ravens to open.
![]()
![]() Legendary Chests 6/6 (The Finger of Damage – Heavy Runic Assault) – Map Hyperlink
Legendary Chests 6/6 (The Finger of Damage – Heavy Runic Assault) – Map Hyperlink
It’s essential open the sixth chest underneath the Raven Tree. Requires having discovered all 48 Odin’s Ravens to open.
Aesir Jail Wreckage
![]()
![]() 1/1 Relic (Motsognir’s Name) – Map Hyperlink
1/1 Relic (Motsognir’s Name) – Map Hyperlink
To the left of the Legendary Chest on this area, on the highest flooring of the jail. It’s not tracked within the area overview for 100% completion so could be simple to miss it, however you may return any time to seize it. The area is barely out there after the story, through a brand new path that opens as much as the left of The Raven Tree in Niflheim.
![]()
![]() Nornir Chests 1/1 – Map Hyperlink
Nornir Chests 1/1 – Map Hyperlink
After getting completed your first playthrough, now you can observe a brand new path to the left of the Raven Tree. Comply with it till you attain the jail. You should go down one flooring to entry this Nornir Chest. Go down one other flooring and stand within the nook to destroy the ceiling.. Then you definately additionally have to destroy 3 totems, one is in entrance of the chest, the second is on the ground beneath the chest. The third one is on the underside flooring.


![]()
![]() Legendary Chests 1/1 – Map Hyperlink
Legendary Chests 1/1 – Map Hyperlink
It’s essential pull the underside chain, then go up the spear after which you’ll get entry to the Legendary Chest.


![]()
![]() 9 Realms in Bloom in Bloom 1/1 – Map Hyperlink
9 Realms in Bloom in Bloom 1/1 – Map Hyperlink
Could be discovered within the jail cell within the nook on the backside flooring.
![]()
![]() The Damaged Jail 1/1 – Map Hyperlink
The Damaged Jail 1/1 – Map Hyperlink
On the underside flooring, swing throughout by utilizing the chains to decrease the spears. After defeating the enemy you’ll encounter there, you may open the cell.
Muspelheim
Burning Cliffs
![]()
![]() Remnants of Asgard 1/1 (+70 Hardened Remnants, +60 Tempered Remnants, +60 Fortified Remnants, +250328 Hacksilver) – Map Hyperlink
Remnants of Asgard 1/1 (+70 Hardened Remnants, +60 Tempered Remnants, +60 Fortified Remnants, +250328 Hacksilver) – Map Hyperlink
After you squeeze by means of the hole, transfer to the lava waterfall and move by means of the opposite aspect. Soar by means of the river of lava and transfer ahead till you attain the camp.
![]()
![]() Lore 1/1 (Rune Learn – Valhalla Rises) – Map Hyperlink
Lore 1/1 (Rune Learn – Valhalla Rises) – Map Hyperlink
You will discover the Rune learn on the camp the place you full the Remnant of Asgard.
![]()
![]() Odin’s Ravens 1/1 – Map Hyperlink
Odin’s Ravens 1/1 – Map Hyperlink
From the Legendary Chest, in your proper you will note the Odin’s Raven just a few meters away.

![]()
![]() Nornir Chests 1/1 – Map Hyperlink
Nornir Chests 1/1 – Map Hyperlink
Cross to the opposite aspect of the lava waterfall and proceed on the trail. A big rock blocks the best way. Break the rock to entry the Nornir Chest. Use the Sigil Arrows to gentle the runes.


![]()
![]() Legendary Chests 1/1 (+1000 Divine Ashes) –Map Hyperlink
Legendary Chests 1/1 (+1000 Divine Ashes) –Map Hyperlink
Comply with the trail till you discover a pot hanging from the ceiling. Break it, and get rid of the enemies

The Crucible
![]()
![]() 9 Realms in Bloom 1/1 – Map Hyperlink
9 Realms in Bloom 1/1 – Map Hyperlink
Close to the store positioned at first of the realm. Simply to the correct.
![]()
![]() Defend Your Valor 1/1 (The Queen’s Armor – Freya Armor, Rond of Obliteration – Defend Attachment, Gna’s Journal) – Map Hyperlink
Defend Your Valor 1/1 (The Queen’s Armor – Freya Armor, Rond of Obliteration – Defend Attachment, Gna’s Journal) – Map Hyperlink
From the store close to the Mystic Gateway, drop all the way down to the realm the place the large sword is, and enter the small hole. Attain the sting, look down and use the hook 3 times. Climb as much as face Gna.
![]()
![]() Nornir Chests 1/1 (Chaos Flame) – Map Hyperlink
Nornir Chests 1/1 (Chaos Flame) – Map Hyperlink
Unlocked after finishing the primary 6 Crucible Challenges.
![]()
![]() Crucible Challenges 15/15: Every one of many 15 crucible challenges out there depend in direction of 100% completion. You may have three paths to decide on (Left, Proper and Heart). In every one in every of these paths, there’s a sword, that permits you to select 2 challenges. Every sword is represented by a Rune (F, N and R)
Crucible Challenges 15/15: Every one of many 15 crucible challenges out there depend in direction of 100% completion. You may have three paths to decide on (Left, Proper and Heart). In every one in every of these paths, there’s a sword, that permits you to select 2 challenges. Every sword is represented by a Rune (F, N and R)
This makes a complete of 6 challenges, two in every path. These are the 6 authentic challenges:
- Problem #1: Weapon Mastery – F Sword (Shoulder Guard of Timeless Pyres – Chest Armor, +250 Divine Ashes, +1000 Hacksilver) – Map Hyperlink
- Problem #2: Flawless – F Sword (+250 Divine Ashes, +1000 Hacksilver) – Map Hyperlink
- Problem #3: Ring Out – N Sword (Bracers of Timeless Pyres – Wrist Armor, +250 Divine Ashes, +1000 Hacksilver) – Map Hyperlink
- Problem #4: Feed the Rift – N Sword (+250 Divine Ashes, +1000 Hacksilver) – Map Hyperlink
- Problem #5: Inhabitants Management – R Sword (Girdle of Timeless Pyres – Waist Armor, +250 Divine Ashes, +1000 Hacksilver) – Map Hyperlink
- Problem #6: King of the Hill – R Sword (+250 Divine Ashes, +1000 Hacksilver) – Map Hyperlink
Word that in the event you full problem #2 earlier than the primary one, you’ll get the Shoulder Guards of Undiying Pyres there. The identical applies to the opposite 4 challenges, the primary one you full from every sword nets you the distinctive merchandise.
Full this primary 6 challenges, will spawn one new problem in every of the three swords. Totaling 9 challenges.
- Problem #7: Rampage – F Sword (+1 Smouldering Embers, +5 Asgardian Ingots, +250 Divine Ashes, +2500 Hacksilver)
- Problem #8: Well being Steal – N Sword (+1 Blazing Embers, +3 Luminous Alloy, +250 Divine Ashes, +2500 Hacksilver)
- Problem #9: Survive – R Sword (+1 Blazing Ember, +3 Smouldering Embers, +2000 Divine Ashes, +40000 Hacksilver)
However that’s not all, now you can work together with the central sword in Muspelheim, to get 6 new challenges, lastly reaching the 15 whole. To unlock these 6 new challenges, it’s important to full 2 challenges from completely different swords:
- Problem #10: Kill Fuse – (Unlocked by finishing 1 : F Sword + N Sword – Rewards: +4 Petrified Bone, +1 Glowing Ember, +250 Divine Ashes, +2500 Hacksilver)
- Problem #11: Boss Rush – (Unlocked by finishing 1 : R Sword + N Sword – Rewards: Muspelheims’s Essence – Amulet Enchantment, +3 Blazing Ember, +1 Smouldering Ember, +2 Glowing Ember, +2000 Divine Ashes, +40000 Hacksilver)
- Problem #12: Defend Breaker – (Unlocked by finishing 1 : F Sword + R Sword – Rewards: Muspelheim’s Pressure – Amulet Enchantment, +2 Blazing Ember, +3 Smouldering Ember, +1 Glowing Ember, +2000 Divine Ashes, +200000 Hacksilver)
- Problem #13: Phantom – (Unlocked by finishing 1 : R Sword + F Sword – Rewards: Surtr’s Scorched Girdle, +3 Blazing Ember, +2 Smouldering Ember, +1 Glowing Ember, +2000 Divine Ashes, +40000 Hacksilver)
- Problem #14: Ring of Fireplace – (Unlocked by finishing 1 : N Sword + F Sword – Rewards: Surtr’s Scorched Arm – Wrist Armor, +1 Blazing Ember, +2 Smouldering Ember, +3 Glowing Ember, +2000 Divine Ashes, +40000 Hacksilver)
Problem #15: Onslaught – (Unlocked by finishing 1 : N Sword + R Sword – Rewards: Muspelheim’s Endurance – Amulet Enchantment, +2 Blazing Ember, +1 Smouldering Ember, +3 Glowing Ember, +2000 Divine Ashes, +40000 hacksilver)
Surtr’s Forge
![]()
![]() Odin’s Ravens 1/1 – Map Hyperlink
Odin’s Ravens 1/1 – Map Hyperlink
Head to the place you first meet Surtr. The realm is recognizable for its quantity of swords coming from the bottom. Go searching to seek out the Raven perching quietly underneath an archway.

Midgard
Shores of 9
![]()
![]() Legendary Chest (1/1) (Sonic Aftershock) – Map Hyperlink
Legendary Chest (1/1) (Sonic Aftershock) – Map Hyperlink
After assembly Freya, climb the chain and you can see the chest on the left aspect of the trail.
![]()
![]() Artifacts 1/1 (Stolen Treasures) – Map Hyperlink
Artifacts 1/1 (Stolen Treasures) – Map Hyperlink
Climb the wall to get contained in the intact headstone and you can see an artifact and a purple chest.
![]()
![]() Yggdrasil Rifts 1/2 (+5 Mud of Realms, +3 Stonewood, +4 Dwarven Metal, +2 Honed Steel, +500 Hacksilver) – Map Hyperlink
Yggdrasil Rifts 1/2 (+5 Mud of Realms, +3 Stonewood, +4 Dwarven Metal, +2 Honed Steel, +500 Hacksilver) – Map Hyperlink
Discovered on the higher stage of Tyr’s Temple’s deck.
![]()
![]() Guiding Mild 1/1 – Map Hyperlink
Guiding Mild 1/1 – Map Hyperlink
Use the Blades of Chaos to burn the blue brambles. The Rune Statue is hidden behind.
![]()
![]() Yggdrasil Rifts 2/2 – Map Hyperlink
Yggdrasil Rifts 2/2 – Map Hyperlink
Discovered north of the Tyr’s Temple, take the correct aspect to achieve the rift, earlier than the elevator.
The Misplaced Treasury
![]()
![]() Nornir Chests 1/1 – Map Hyperlink
Nornir Chests 1/1 – Map Hyperlink
Climb to the highest proper of the large golden protect and you will note the primary rune. Use the Sigil Arrows to ignite it. The second rune might be seen as soon as you progress the large protect to the left aspect. The third rune is to the correct of the Legendary Chest.


![]()
![]() Legendary Chests 1/1 (Sigil Punishment – Accent, +1 Folkvangr Whetstone) – Map Hyperlink
Legendary Chests 1/1 (Sigil Punishment – Accent, +1 Folkvangr Whetstone) – Map Hyperlink
The Legendary Chest is positioned behind the large golden protect. To entry it, you could first climb to the correct of the highest. Use the Blades of Chaos to maneuver the massive golden protect to the correct and climb to the highest. Destroy the pot subsequent to the pillar. Go down, and transfer the large protect to the left. A rune might be seen on the correct. Use the Sigil Arrows to activate the rune. Climb again up, and use the pillar to dam the protect. Transfer the large protect to the aspect and the gate to the chest might be seen. Use the picket wheel to raise the gate. You should block the 2 round mechanisms in order that the gate stays open.


![]()
![]() Lore 1/2 (Lore Marker – Love’s Finish) – Map Hyperlink
Lore 1/2 (Lore Marker – Love’s Finish) – Map Hyperlink
Discovered within the space the place you encounter the Traveler Champion. Defeat enemies within the space to entry this Lore Marker
![]()
![]() Sigrun’s Curse 1/1 – Map Hyperlink
Sigrun’s Curse 1/1 – Map Hyperlink
After the earlier Lore Marker, Mimir and Kratos will discuss concerning the state of affairs after which Freya will be part of the dialog. There you’ll full de Sigrun’s Curse Favors and likewise receive the Sigrun Lore Entry.
![]()
![]() Lore 2/2 (The Misplaced Pages) – Map Hyperlink
Lore 2/2 (The Misplaced Pages) – Map Hyperlink
After the earlier Sigrun’s Curse, head again and use your weapon to destroy the bottom beneath you. THen you may collect The Misplaced Pages from the bottom
Effectively of Urd
![]()
![]() Legendary Chest 1/1 (Rond of Purification – Defend Attachment) – Map Hyperlink
Legendary Chest 1/1 (Rond of Purification – Defend Attachment) – Map Hyperlink
After finishing The Phrase of Destiny, you will note a marked wall on the alternative aspect. Slide down the wall you’re on and use Blade of Chaos to destroy the alternative wall and entry the Legendary Chest.

![]()
![]() Nornir Chest 1/1 – Map Hyperlink
Nornir Chest 1/1 – Map Hyperlink
After utilizing the rope to descend, hit the final construction in your proper to entry the Nornir Chest beneath you.


![]()
![]() Odin’s Ravens 1/1 – Map Hyperlink
Odin’s Ravens 1/1 – Map Hyperlink
Climb up the mountain behind the Hel tear. As soon as on the high, simply flip round to seek out the Raven perching.

![]()
![]() Hel Tears 1/1 (Frozen Spark – Weapon Improve) – Map Hyperlink
Hel Tears 1/1 (Frozen Spark – Weapon Improve) – Map Hyperlink
Climb to the place you discover the second Nornir brazier. Use the hole to entry the subsequent space to seek out the Hel Tear.
![]()
![]() Remnants of Asgard 1/1 – Map Hyperlink
Remnants of Asgard 1/1 – Map Hyperlink
Word that that is solely out there after ending the primary story. You will discover a gaggle of enemies at first of the realm. Defeat them to finish this
King’s Grave
![]()
![]() 1/1 Relic (Hilt of Skofnung) – Map Hyperlink
1/1 Relic (Hilt of Skofnung) – Map Hyperlink
Gamers want to finish all Berserker Gravestones in an effort to face King Hrolf Kraki. Defeat him to acquire the Relic
![]()
![]() Berserker Headstone 1/1 (Hilt of Skofnung – Relic, Helheim’s Advantage – Amulet Enchantment) – Map Hyperlink
Berserker Headstone 1/1 (Hilt of Skofnung – Relic, Helheim’s Advantage – Amulet Enchantment) – Map Hyperlink
From the King’s Grave Mystic Gateway, take the left path all the best way to achieve the Berserker Headstone.
Sanctuary Grove
![]()
![]() 9 Realms in Bloom in Bloom 1/1 (Mirkweed) – Map Hyperlink
9 Realms in Bloom in Bloom 1/1 (Mirkweed) – Map Hyperlink
Encompass Chaurli, the large turtle-like monster, to the left aspect. You’ll ultimately discover the Mirkweed on the bottom.
The Oarsmen
![]()
![]() Nornir Chest 1/1 – Map Hyperlink
Nornir Chest 1/1 – Map Hyperlink
It’s essential flip the spinning runes to match those that the chest is exhibiting. The primary one is to the left of the chest, the second is on the alternative aspect of the room, just under the construction, and the third spinning rune is behind the torches that illuminate the chook’s head statue


![]()
![]() Legendary Chests 1/1 (Jewel of Yggdrasil – Amulet Fragment) – Map Hyperlink
Legendary Chests 1/1 (Jewel of Yggdrasil – Amulet Fragment) – Map Hyperlink
The Legendary Chest is in the identical room because the Mystic Gateway, however to entry it you first must climb the stone wall after which the golden chain to the highest. As soon as on the high, pull the large gable that hides a aspect entrance blocked by picket boards and the steps that entry the Mystic Gateway.

![]()
![]() Artifacts 1/2 (Stolen Treasure – Ankh) – Map Hyperlink
Artifacts 1/2 (Stolen Treasure – Ankh) – Map Hyperlink
The artifact could be discovered within the hidden room beneath the stone staircase that results in the Legendary Chest.
![]()
![]() Lore 1/1 (Lore Marker – An Accursed Identify) – Map Hyperlink
Lore 1/1 (Lore Marker – An Accursed Identify) – Map Hyperlink
The Lore Markers is in the identical room because the Mystic Gateway, however to entry it you first must climb the stone wall after which the golden chain to the highest. As soon as on the high, pull the large gable that hides a aspect entrance blocked by picket boards and the steps that entry the Mystic Gateway.
![]()
![]() Odin’s Ravens 1/1 – Map Hyperlink
Odin’s Ravens 1/1 – Map Hyperlink
Could be discovered excessive up on the aspect of the mountain

![]()
![]() Artifacts 2/2 (Kvasir’s Poems – The Lifeless don’t Experience) – Map Hyperlink
Artifacts 2/2 (Kvasir’s Poems – The Lifeless don’t Experience) – Map Hyperlink
Could be discovered close to the Nornir Chest. Climb again up the identical wall you climbed earlier. You will discover the artifact on the high.
The Derelict Outpost
![]()
![]() Lore 1/2 (Lore Marker – Blodugr Steinn) – Map Hyperlink
Lore 1/2 (Lore Marker – Blodugr Steinn) – Map Hyperlink
After reaching The Derelict Outpost, go into the cave in your left. Undergo the cavern and out of it, go to your left to the tip of the trail to discover a Lore Marker.
![]()
![]() Artifact 1/1 (Stolen Treasures – Lyre) – Map Hyperlink
Artifact 1/1 (Stolen Treasures – Lyre) – Map Hyperlink
After the earlier chest, head again till you attain a series. Activate the mechanism to raise the wooden and use it to cross to the platform on the opposite aspect. Defeat all enemies forward, then climb all the way down to face down new enemies. There you may collect an Artifact from the bottom.
![]()
![]() Odin’s Raven 1/2 – Map Hyperlink
Odin’s Raven 1/2 – Map Hyperlink
After the earlier chest, return to the earlier platform. From there take the left and go up the wall. From right here you may shoot down an Odin’s Raven.

![]()
![]() Lore 2/2 (Lore Marker – The Dying Of Helgi) – Map Hyperlink
Lore 2/2 (Lore Marker – The Dying Of Helgi) – Map Hyperlink
After the earlier purple chest, observe the trail till you attain a brand new picket mechanism. Use the chain to decrease it to the underside. Then hit the plate to flip it over. After that, use the chain once more to raise it again as much as the highest. Then go forward and climb the wall in your left, then flip proper to make use of the mechanism to get to the platform on the opposite aspect. As soon as there, climb the wall in your left, then you can see a brand new Lore Marker
![]()
![]() Legendary Chest 1/1 (Ivaldi’s Anvil – Heavy Runic Assault, +30 Whispering Slab) – Map Hyperlink
Legendary Chest 1/1 (Ivaldi’s Anvil – Heavy Runic Assault, +30 Whispering Slab) – Map Hyperlink
After the earlier Lore Marker, take your left and you can see this a brand new Legendary Chest

![]()
![]() Odin’s Raven 2/2 – Map Hyperlink
Odin’s Raven 2/2 – Map Hyperlink
After climbing down the chain, observe the trail till you discover one other Odin’s Raven above you.

Lake of 9
![]()
![]() 1/1 Relic (Mystical Heirloom) – Map Hyperlink
1/1 Relic (Mystical Heirloom) – Map Hyperlink
Behind a destructible ice wall, should throw the spear at it. Then the Relic is on the bottom subsequent to a Lore Scroll and a frozen corpse.
![]()
![]() Berserker Headstone (Chaos Spark – Weapon Improve, +60 Mud of Realms, +3 Sovereign Coals, +5000 Hacksilver) – Map Hyperlink
Berserker Headstone (Chaos Spark – Weapon Improve, +60 Mud of Realms, +3 Sovereign Coals, +5000 Hacksilver) – Map Hyperlink
After defeating The Hateful, you may entry a brand new Pink Chest
![]()
![]() Yggdrasil Rifts 1/1 (+5 Mud of Realms +3 Stonewood, +4 Dwarven Metal, +2 Honed Steel, +500 Hacksilver) – Map Hyperlink
Yggdrasil Rifts 1/1 (+5 Mud of Realms +3 Stonewood, +4 Dwarven Metal, +2 Honed Steel, +500 Hacksilver) – Map Hyperlink
After the earlier Chest, observe the trail and head down the steps to get an Yggdrasill Rift
![]()
![]() Guiding Mild 1/3 – Map Hyperlink
Guiding Mild 1/3 – Map Hyperlink
Could be discovered on one of many sides of the large helmet discovered in the course of the frozen lake.
![]()
![]() Lore 1/4 (Rune Learn -Tyr’s Helmet) – Map Hyperlink
Lore 1/4 (Rune Learn -Tyr’s Helmet) – Map Hyperlink
Could be discovered on one of many sides of the large helmet discovered in the course of the frozen lake.
![]()
![]() Lore 2/4 (Rune Learn – Tyr’s Spear) – Map Hyperlink
Lore 2/4 (Rune Learn – Tyr’s Spear) – Map Hyperlink
Could be discovered Close to Tyr’s Temple bridge, within the southwest part of the lake.
![]()
![]() Artifact 1/3 (Stolen Treasures – Kila) – Map Hyperlink
Artifact 1/3 (Stolen Treasures – Kila) – Map Hyperlink
Head up the steps to the Stolen Treasures Artifact from the bottom subsequent to a corpse
![]()
![]() Odin’s Ravens 1/2 – Map Hyperlink
Odin’s Ravens 1/2 – Map Hyperlink
Could be discovered on one of many sides of the large doorways, Northeastern to Tyr’s Temple.

![]()
![]() Berserker Headstone 1/1 (Berserker Waist Guard – Waist Armor, +25 Bonded Leather-based, Tempered Remnants):
Berserker Headstone 1/1 (Berserker Waist Guard – Waist Armor, +25 Bonded Leather-based, Tempered Remnants):
Go to the Berserker Headstone protruding of the frozen lake and summon Fraekni the Zealous. Defeat the King to accumulate a New Lore Entry
![]()
![]() Guiding Mild 2/3 – Map Hyperlink
Guiding Mild 2/3 – Map Hyperlink
Could be discovered Close to Tyr’s Temple bridge, within the southwest part of the lake.
![]()
![]() Guiding Mild 3/3 – Map Hyperlink
Guiding Mild 3/3 – Map Hyperlink
After getting on the sled, maintain going till you discover the Guiding Mild on the correct aspect of the highway.
![]()
![]() Lore 3/4 (Rune Learn: Tyr’s Left Bracer) – Map Hyperlink
Lore 3/4 (Rune Learn: Tyr’s Left Bracer) – Map Hyperlink
Subsequent to the earlier Guiding Mild you’ll find this Rune Learn
![]()
![]() Remnants of Asgard 1/1 (+70 Hardened Remnants, +60 Tempered Remnants, +60 Fortified Remnants, +2500000 Hacksilver) – Map Hyperlink
Remnants of Asgard 1/1 (+70 Hardened Remnants, +60 Tempered Remnants, +60 Fortified Remnants, +2500000 Hacksilver) – Map Hyperlink
Head to the Raider Stronghold space, and head up utilizing the elevator. Flip proper to seek out the Remnants of Asgard.
![]()
![]() Buried Treasure 1/2 – Treasure Map – Viking’s Reward (+25 Shattered Rune, +1 Stonewood, +1 Dwarven Metal, +1 Honed Steel, Midgard’s Justice – Amulet Enchantment) – Map Hyperlink
Buried Treasure 1/2 – Treasure Map – Viking’s Reward (+25 Shattered Rune, +1 Stonewood, +1 Dwarven Metal, +1 Honed Steel, Midgard’s Justice – Amulet Enchantment) – Map Hyperlink
From Tyr’s Temple elevator, flip instantly to the correct and observe that path nearly till the tip to the Raider Hideout. You’ll full the treasure map Viking’s Reward there.
![]()
![]() Legendary Chest 1/1 (Lion’s Roar Sauroter – Spear Attachment) – Map Hyperlink
Legendary Chest 1/1 (Lion’s Roar Sauroter – Spear Attachment) – Map Hyperlink
Destroy the marked stone utilizing the Draupnir Spear. Struggle the Frost Phantom that emerges and you can see the Legendary Chest behind the unique location of the destroyed stone.


![]()
![]() Buried Treasure 2/2 – Treasure Map – Demise of Dagestr (Helheim’s Pressure – Amulet Enchantment, +2 Petrified Bone, +2 Luminous Alloy, +2 Asgardian Ingot, +40 Shattered Rune) – Map Hyperlink
Buried Treasure 2/2 – Treasure Map – Demise of Dagestr (Helheim’s Pressure – Amulet Enchantment, +2 Petrified Bone, +2 Luminous Alloy, +2 Asgardian Ingot, +40 Shattered Rune) – Map Hyperlink
Head close to the Raider Fort entrance, you can see a stone that may be destroyed with the Draupnir Spear. Do it and observe the trail till the tip to finish the Demise of Dagestr treasure map.
![]()
![]() Artifact 2/3 (Stolen Treasures – Maya ) – Map Hyperlink
Artifact 2/3 (Stolen Treasures – Maya ) – Map Hyperlink
Within the lake of 9 space, take your sledge to the jap “arm” of Tyr’s Temple, you can see the artifact close to a physique there.
![]()
![]() Lore 4/4 (Lore Scroll – Receipt of Buy) – Map Hyperlink
Lore 4/4 (Lore Scroll – Receipt of Buy) – Map Hyperlink
Southwestern to Tyr’s Temple, you can see a block of ice than could be destroyed utilizing Draupnir Spear. This can open a path, on the left aspect you can see a physique and the scroll earlier than it.
![]()
![]() Artifact 3/3 (Stolen Treasures – Jambiya) – Map Hyperlink
Artifact 3/3 (Stolen Treasures – Jambiya) – Map Hyperlink
Circling Tyr’s Temple, you can see a small cave-like entrance with frozen stalactites. Hit them to destroy them and achieve entry. The artifact is close to the doorway, earlier than a frozen physique.
![]()
![]() Odins’ Ravens 2/2 – Map Hyperlink
Odins’ Ravens 2/2 – Map Hyperlink
Could be discovered inside an ice cave, south to Tyr’s Temple.

The Everlasting Campfire
![]()
![]() Throughout the Realms 1/1 (+30 Whispering Slab, Meal of Consolation – Useful resource) – Map Hyperlink
Throughout the Realms 1/1 (+30 Whispering Slab, Meal of Consolation – Useful resource) – Map Hyperlink
From the realm with the massive gates, take the small ledge in your left and maintain heading ahead. Finally the realm will fork in two paths, flip to the left. Climb the ledge together with your Blades of Chaos and proceed till you attain the campfire. Work together with it. You must have gathered the 4 elements beforehand.
Raider Fort
![]()
![]() Lore 1/1 – (Treasure Map Viking’s Reward) – Map Hyperlink
Lore 1/1 – (Treasure Map Viking’s Reward) – Map Hyperlink
Within the camp-like space, you can see it close to a small bonfire and some crates and animal skins.
![]()
![]() Kol Raider Camps 1/1 – Map Hyperlink
Kol Raider Camps 1/1 – Map Hyperlink
As soon as you’re within the space, it’s important to clear the camp of enemies.
Raider Preserve
![]()
![]() Kol Raider Camps 1/1 – Map Hyperlink
Kol Raider Camps 1/1 – Map Hyperlink
Comply with the paths of blood that result in the slender entrance. Kill all enemies
Raider Stronghold
![]()
![]() 1/1 Relic (Hilt of Ridill) – Map Hyperlink
1/1 Relic (Hilt of Ridill) – Map Hyperlink
Gamers have to defeat Olaf Nautson, whereas doing the favor Animal Instincts. He drops Crackle of Bilskirnir when defeated. It may be used to craft this hilt.
![]()
![]() Legendary Chests 1/1 (Cyclone of Chaos – Mild Runic Assault) – Map Hyperlink
Legendary Chests 1/1 (Cyclone of Chaos – Mild Runic Assault) – Map Hyperlink
Could be discovered on the different aspect of the Camp. You’ll have to move by means of the trail ahead, after defeating the Raiders.

![]()
![]() Kol Raider Camps 1/1: – Map Hyperlink
Kol Raider Camps 1/1: – Map Hyperlink
Under Tyr’s Temple you can see the camp with a gaggle of enemies. Clear the camp in an effort to full this.
Raider Hideout
![]()
![]() Legendary Chest 1/1 (Tartarus Rage – Heavy Runic Assault) – Map Hyperlink
Legendary Chest 1/1 (Tartarus Rage – Heavy Runic Assault) – Map Hyperlink
After the earlier Artifact, head down the steps and observe the trail to your left till you see the Statue of Tyr. Then, climb the wall with symbols to enter the Raider Hideout area. Proceed till you’re going through a gaggle of Kol Raider enemies. After defeating them, you’ll find one other chest on the correct.

![]()
![]() Nornir Chest 1/1 – Map Hyperlink
Nornir Chest 1/1 – Map Hyperlink
To entry this chest, you could first seize a fireplace stone from the vessel subsequent to the doorway. Subsequent, stand to your proper going through the abyss. Then use Sigil Arrows and throw the hearth stone to detonate the bubbles, so you may then open the chest.


![]()
![]() Kol Raider Camps 1/1 – Map Hyperlink
Kol Raider Camps 1/1 – Map Hyperlink
Enter the camp and clear it of enemies.
Svartalfheim
Aurvangar Wetlands
![]()
![]() Odin’s Raven (1/1) – Map Hyperlink
Odin’s Raven (1/1) – Map Hyperlink
Transfer ahead till Atreus stops, then flip to the left and transfer ahead. Take a look at the highest of the hill, to see the raven. Throw your axe to destroy it.

![]()
![]() Nornir Chests 1/2 – Map Hyperlink
Nornir Chests 1/2 – Map Hyperlink
After you freeze the primary geyser,soar to the opposite aspect however don’t head up with Atreus, flip to the correct and soar over the small “island”. In your proper, you can see the primary rune. Return to the earlier “island” and freeze the opposite geyser. On the island that’s behind the chest you can see the second rune. Throw the Leviathan axe to destroy it. Return to the earlier “island” and freeze the opposite geyser. Use the blades of chaos to climb the construction. Flip to the left and you can see the third rune.Now you can open the chest.


![]()
![]() Nornir Chests 2/2 – Map Hyperlink
Nornir Chests 2/2 – Map Hyperlink
After you handle to open the gate utilizing the water geysers, take your boat and transfer ahead. In case you see a shiny chest on an higher stage, to your left aspect, you’re in the correct space. Transfer to the left, till you discover one other slender path the place Kratos wants to put down on the boat. Undergo it, and disembark. Flip proper and you can see the chest there. It’s essential flip the spinning runes to match those that the chest is exhibiting. The primary one could be discovered previous the chest, behind a water geyser. The second could be discovered close to the piece of picket bridge. Flip again 180 levels from the water geyser location and transfer ahead, you can see it in your left. The third one could be discovered on the higher stage, when you climb utilizing the blades of chaos, flip to your proper and transfer till the next construction is in your proper, flip proper once more, and you can see the spinning rune there. Hit it together with your axe. Return to the chest to open it.


![]()
![]() Legendary Chests 1/1 (Lethal Obsidian Handles – Blades Attachment) – Map Hyperlink
Legendary Chests 1/1 (Lethal Obsidian Handles – Blades Attachment) – Map Hyperlink
On the island the place you discover the second Nornir Chest. Use the blades of chaos to climb to the higher stage, positioned on the left aspect. As soon as on the higher stage, flip left, combat some small enemies and head to the chest.

![]()
![]() Lore 1/1 (Lore Marker – Unsafe Roads) – Map Hyperlink
Lore 1/1 (Lore Marker – Unsafe Roads) – Map Hyperlink
On the island the place you discover the second Nornir Chest. Use the blades of chaos to climb to the higher stage, in your left aspect. Flip proper and soar down. Work together with it to make Mimir activate it.
![]()
![]() Artifacts 1/2 (Issues Left Behind – Hreidmar’s Brassard) – Map Hyperlink
Artifacts 1/2 (Issues Left Behind – Hreidmar’s Brassard) – Map Hyperlink
Freeze the opposite geyser and use the Blades of Chaos to climb the construction. Transfer ahead in direction of an unmoving physique to seek out it. It’s in the identical construction you discover the third rune for the Nornir Chest talked about earlier.
![]()
![]() Artifacts 2/2 (Kvasir’s Poems – The Dawn of Nothingness) – Map Hyperlink
Artifacts 2/2 (Kvasir’s Poems – The Dawn of Nothingness) – Map Hyperlink
Virtually unattainable to overlook, whereas finishing the second gate to make method on your boat. As soon as you’re on the second chain to open the large gate, free the geyser utilizing the Blades of Chaos after which freeze the one you had to make use of earlier than in an effort to cross. Get your self within the place proven within the image to have the ability to see the place to throw your Leviathan Axe. When you find yourself in place, recall your axe, and calculate to hit the rope within the actual level to make the platform go down.Get on the platform and, from there freeze the opposite geyser.As soon as the platform is risen, depart it and recall your axe. The artifact might be in entrance of you.
![]()
![]() Hel Tears 1/1 (Frozen Spark – Weapon Improve) – Map Hyperlink
Hel Tears 1/1 (Frozen Spark – Weapon Improve) – Map Hyperlink
North of the docking level that’s previous the watermill. Climb over the picket construction and soar over the water to achieve.
![]()
![]() Remnants of Asgard 1/1 – Map Hyperlink
Remnants of Asgard 1/1 – Map Hyperlink
Previous the slender arch passage within the rocks, on the shore with varied flags in it.
Sverd Sands:
![]()
![]() A Viking Funeral 1/1 – Map Hyperlink
A Viking Funeral 1/1 – Map Hyperlink
Word that it’s important to end the primary story first to get this. Speak to Lunda at Sindri’s Home. After that, head to Nidavellir, and work together with Brok in the home positioned on the heart of the city. Take the Mystic Gateway to the Aurvangar Wetlands, and take the ferry on the left. It should lead you to the Sverd Sands.Work together with Brok once more to look at a cutscene. After it, the hunt might be accomplished.
Alberich Island
![]()
![]() Nornir Chest 1/1 – Map Hyperlink
Nornir Chest 1/1 – Map Hyperlink
As quickly as you disembark you can see the Nornir Chest in your proper. In your proper there may be the primary bell with a run, the second is simply behind you. Command Atreus to shoot a Sonic Arrow to the crane, to interrupt it. This can decrease the second bell, permitting you to have the ability to hit it. The third one is on the far proper, use the axe to maneuver the picket platform, this may raise the Rune.


![]()
![]() Berserker Headstone 1/1 (+25 Shattered Rune, +25 Bonded Leather-based, +2 Tempered Remnants, Asgard’s Would possibly – Amulet Enchantment) – Map Hyperlink
Berserker Headstone 1/1 (+25 Shattered Rune, +25 Bonded Leather-based, +2 Tempered Remnants, Asgard’s Would possibly – Amulet Enchantment) – Map Hyperlink
Could be discovered in the course of the island, laborious to overlook. Activate it with the sword hilt.
![]()
![]() Odin’s Ravens 1/2 – Map Hyperlink
Odin’s Ravens 1/2 – Map Hyperlink
Use the Draupnir Spear, to climb to the higher stage. Flip proper and transfer ahead. In your left, ore will block the trail, use sonic arrows to move. You will discover the raven circling a bit of bit additional in.

![]()
![]() Yggdrasil Rift 1/1 (+25 Mud of Reams, +2 Lyndwyrm Scales, +3000 Hacksilver) – Map Hyperlink
Yggdrasil Rift 1/1 (+25 Mud of Reams, +2 Lyndwyrm Scales, +3000 Hacksilver) – Map Hyperlink
Use the Draupnir Spear, to climb to the higher stage. Flip proper and transfer ahead. In your left, ore will block the trail, use sonic arrows to move. Flip proper and you will note a spot to throw your spear, do it and this may free the geyser, activating the water wheel within the course of. Head again to the place the ore was, earlier than you shoot it, and you can see an elevator. Take it and use the hook to cross to the opposite aspect.
![]()
![]() Lore 1/1 (Treasure Map – Washed Ashore) – Map Hyperlink
Lore 1/1 (Treasure Map – Washed Ashore) – Map Hyperlink
From the platform the place you discovered the Yggrasil rift, you can see one other climbable hook. Use the blades to achieve the opposite aspect. You will discover the treasure map close to the water wheel.
![]()
![]() Legendary Chest 1/1 ( Jewel of Yggdrasil – Amulet Fragment) – Map Hyperlink
Legendary Chest 1/1 ( Jewel of Yggdrasil – Amulet Fragment) – Map Hyperlink
After grabbing the treasure map, maintain going to the correct and you’ll attain a series. You should utilize it to decrease the gate, however first destroy the massive rock blocking your view. You must use the Draupnir Spear for that. Then throw your axe to the gear on the aspect of the water wheel. Freya might want to freeze it. Then flip again to the opposite aspect, and name again your axe. Use it to freeze the geyser, this may decrease an elevator. Take the elevator utilizing the now out there hook earlier than it. As soon as on the elevator, use the Draupnir Spear to interrupt the stones that the place blocking the gate. Name again your axe to get to the higher stage. There might be some wretches to combat. Use the 2 climbable spots to achieve the very best stage, and switch proper to seek out the Legendary Chest.


![]()
![]() Odin’s Ravens (2/2) – Map Hyperlink
Odin’s Ravens (2/2) – Map Hyperlink
After discovering the Washed Ashore treasure, simply climb the small ledge and look by means of the “window” in your left. You will discover the Raven there.

![]()
![]() The Misplaced Treasure 1/1 – Map Hyperlink
The Misplaced Treasure 1/1 – Map Hyperlink
You’ll come to a spirit, and discuss to it. You want the Draupnir Spear, to create a path. It may be discovered to the correct of the Berserker Headstone. It doesn’t matter if you already have the favor from the opposite spirit in Alberich Hole, you have to discuss to this one too. This can create a marker on the finish of the zone. Attain the Legendary Chest and open it, this may mark this job as accomplished in your map.
Althjof’s Rig
![]()
![]() Odin’s Ravens (1/1) – Map Hyperlink
Odin’s Ravens (1/1) – Map Hyperlink
As quickly as you attain Althjof’s Rig, flip left and thru the hole on the picket wall, you will note the Raven standing. Throw the Leviathan Axe to kill it.

![]()
![]() Lore 1/2 (Rune Learn – The Squasher) – Map Hyperlink
Lore 1/2 (Rune Learn – The Squasher) – Map Hyperlink
From the widespread chest, flip again and use the blades of chaos to explode the barrel. Enter the subsequent space and head to the wall with the reddish-wood and use the blades of chaos to climb. Proceed the trail till the tip and open the heavy door. Drop down and use the blades of chaos once more to explode the barrel. This can create a climbable path, take it and climb in direction of your left aspect. Finally, you’ll come as much as a small space from the place you may soar to interrupt the bottom. After a brief combat with some enemies, you can see the Runes behind the room. Work together with them to learn them
![]()
![]() Mining Rig 1/1 (Nidavellir Ore – Distinctive Useful resource, +2 Slag Deposits, +500 Hacksilver) – Map Hyperlink
Mining Rig 1/1 (Nidavellir Ore – Distinctive Useful resource, +2 Slag Deposits, +500 Hacksilver) – Map Hyperlink
Head to the wheel to maneuver the platform on the second highest stage. Head again to the decrease flooring and use the Blades of Chaos on the hook to maneuver the opposite platform up. Climb the trail behind you, and switch proper and climb once more utilizing the blades of chaos. Flip left and use the blades on the hook to leap by means of. Climb the wall in entrance of you, to achieve the mining rig. Defeat the Draugr, after which work together with the forge.
![]()
![]() Lore 2/2 (Lore Scroll – Ardour) – Map Hyperlink
Lore 2/2 (Lore Scroll – Ardour) – Map Hyperlink
Place the shifting platform at its highest, after which use the newly out there chain to climb again up. Use the blades of chaos on the platform’s hook to leap throughout after which use the blades to interrupt the wall. Flip proper to seek out the Lore scroll on the bottom, close to the wall.
![]()
![]() Legendary Chest 1/1 – (Njord’s Tempest – Mild Runic Assault) – Map Hyperlinkmi
Legendary Chest 1/1 – (Njord’s Tempest – Mild Runic Assault) – Map Hyperlinkmi
From the second scroll, head to the tip of the room, and switch proper. ytou will discover the chest on the finish of the walkway


Modvitnir’s Rig
![]()
![]() Legendary Chest 1/1 – (Muspelheim Seed Half – Key Merchandise) – Map Hyperlink
Legendary Chest 1/1 – (Muspelheim Seed Half – Key Merchandise) – Map Hyperlink
When you attain Modvitnir’s Rig space, combat the Wretches and climb the ledge simply in entrance of you. Flip proper and use the blades of Chaos to climb. Throw your axe to the spinning system, to open the door. Cross by means of it and soar to the opposite aspect. Climb and transfer to your left till you may go up. Struggle the enemies and open the chest to acquire the seed half.


![]()
![]() Lore 1/1 (Lore Marker – Warning) – Map Hyperlink
Lore 1/1 (Lore Marker – Warning) – Map Hyperlink
From the Legendary Chest, use the crane to achieve the opposite aspect and drop down by means of the damaged space. As soon as there, work together with the large tablet-like object.
![]()
![]() Mining Rig 1/1 (+2 Cast Iron, +500 Hacksilver, Nidavellir Ore – Distinctive Useful resource) – Map Hyperlink
Mining Rig 1/1 (+2 Cast Iron, +500 Hacksilver, Nidavellir Ore – Distinctive Useful resource) – Map Hyperlink
Whereas traversing utilizing the crane, climb up, and you’ll attain the mining rig. Struggle the enemies, and work together with the forge within the center.
![]()
![]() Buried Treasure 1/1 – Treasure Map – Fruits of Trade (+1 Petrified Bone, +1 Luminous Alloy, +1 Asgardian Ingot, +40 Shattered Rune, Svartalfheim’s Lifeblood – Amulet Enchantment) – Map Hyperlink
Buried Treasure 1/1 – Treasure Map – Fruits of Trade (+1 Petrified Bone, +1 Luminous Alloy, +1 Asgardian Ingot, +40 Shattered Rune, Svartalfheim’s Lifeblood – Amulet Enchantment) – Map Hyperlink
Disembark on Modvitnir’s Rig, climb the primary ledge and barely to the correct you can see the
![]()
![]() Buried Treasure.
Buried Treasure.
Nidavellir
![]()
![]() 1/1 Relic (Huldra Challenge 9) – Map Hyperlink
1/1 Relic (Huldra Challenge 9) – Map Hyperlink
Could be crafted at any blacksmith store. It may be discovered underneath Particular Objects – Relics. It prices 10,000 Hacksilver.
![]()
![]() Lore 1/2 (Lore Scroll – Purchasing Checklist) – Map Hyperlink
Lore 1/2 (Lore Scroll – Purchasing Checklist) – Map Hyperlink
Discovered close to Sindri’s Store in Nidavellir.
![]()
![]() Artifact 1/2 ( Kvasir’s Poems – Massive Society Floor Orb, The Efficiency) – Map Hyperlink
Artifact 1/2 ( Kvasir’s Poems – Massive Society Floor Orb, The Efficiency) – Map Hyperlink
Use Atreus’ Sonic Arrows to destroy the three shields discovered at first of the realm, on the finish of the walkaway in your left aspect, you can see the poem.
![]()
![]() Odin’s Ravens (1/1) – Map Hyperlink
Odin’s Ravens (1/1) – Map Hyperlink
Flip again from Sindri’s Store and go ahead till you attain a climbable wall. Climb it and head all the best way to the tip, you can see a water wheel there. Transfer the digital camera till you can see a Raven perched up on the high of a close to home. Throw your axe to destroy it.

![]()
![]() Artifact 2/2 (Issues Left Behind -Griep’s Firebomb) – Map Hyperlink
Artifact 2/2 (Issues Left Behind -Griep’s Firebomb) – Map Hyperlink
After the assembly with Sindri, move by means of the small passage, and as soon as exterior, maintain shifting ahead till you attain the tip of the highway. Flip left, and go into the darkish tunnel. Drop down on the seemingly damaged bridge and you can see the artifact there.
![]()
![]() Legendary Chest 1/1 (Luminous Restoration Handles – Blades Attachment) – Map Hyperlink
Legendary Chest 1/1 (Luminous Restoration Handles – Blades Attachment) – Map Hyperlink
Within the space the place you discover ore in what appears to be an enormous bonfire within the center, use the Draupnir Spear in between two small homes, to have the ability to attain the higher stage.


![]()
![]() Lore 2/2 (Treasure Map – Mining Glory) – Map Hyperlink
Lore 2/2 (Treasure Map – Mining Glory) – Map Hyperlink
Within the space the place you discover ore in what appears to be an enormous bonfire within the center, use the Draupnir Spear in between two small homes, to have the ability to attain the higher stage. You will discover a Legendary Chest and the treasure map a bit additional in.
![]()
![]() 9 Realms in Bloom in Bloom 1/1 – Map Hyperlink
9 Realms in Bloom in Bloom 1/1 – Map Hyperlink
Within the space the place there’s a blocked bridge. Use the Draupnir Spear to construct a path. Cross to the opposite aspect to seek out the botanical merchandise.
![]()
![]() Berserker Gravestones 1/1 (+2 Tempered Remnants, +25 Bonded Leather-based, +25 Shattered Rune, Asgard’s Fortitude – Amulet Enchantment) – Map Hyperlink
Berserker Gravestones 1/1 (+2 Tempered Remnants, +25 Bonded Leather-based, +25 Shattered Rune, Asgard’s Fortitude – Amulet Enchantment) – Map Hyperlink
As you allow The Forge on the wagon with Freya, you can see the Headstone within the subsequent space. Unattainable to overlook. Hardrefill the Callous will problem you, put together for a tricky combat.
![]()
![]() Spirit of Rebel 1/1 – Map Hyperlink
Spirit of Rebel 1/1 – Map Hyperlink
You must return Durlin’s hammer to him. You require accepting the mission from him first on the Tavern in Nidavellir. You must head to Dragon Seashore, and use the Draupnir Spear, to climb the construction on the left. Soar throughout and use the chisel on a column positioned on the left aspect. This can permit her to learn some runes. The statue will transfer, revealing a chest containing the hammer. Take it again to Durlin to finish it. Word that it’s important to full Fundamental Mission 10: Forging Future, earlier than with the ability to sort out this favor.
Radsvinn’s Rig
![]()
![]() Mining Rig (1/1) – Map Hyperlink
Mining Rig (1/1) – Map Hyperlink
As you enter the island, head previous Sindri’s Store, take the left path and climb up. You’ll have to combat a gaggle of enemies and after defeating them, work together with the forge. +500 Hacksilver, +2 Rawhide, Nidavellir Ore.
![]()
![]() Odin’s Ravens (1/1) – Map Hyperlink
Odin’s Ravens (1/1) – Map Hyperlink
On the mining rig, climb to the higher platform.Flip again and have a look at the hook of the crane on the again. You will note the Raven there. Use the Leviathan Axe to destroy it.

![]()
![]() Lore (1/1) Lore Scroll – Map Hyperlink
Lore (1/1) Lore Scroll – Map Hyperlink
Climbing the Ladder: On the mining rig, head to the tip of the trail and you can see it close to a chest.
![]()
![]() Nornir Chest – Map Hyperlink
Nornir Chest – Map Hyperlink
Discovered along side the forge. The primary Rune is extremely near the chest. Use the Blades of Chaos to ignite it.One of many runes is “trapped”, however you’re unable to achieve it. Climb to the higher stage and use the Leviathan axe to destroy the exploding barrel, this may activate the rune. The third one could be discovered in opposition to the wall on the finish, close to the Lore scroll. It’s essential use Atreus Sonic Arrows to interrupt two barrels, and the second rune could be discovered there. Use the blades of chaos to burn it.
The Watchtower
![]()
![]() Draugr Holes 1/1 (Cursed Empress Handles – Blades Attachment, +2 Sovereign Coals, +5 Mud of Realms, +250 Hacksilver) – Map Hyperlink
Draugr Holes 1/1 (Cursed Empress Handles – Blades Attachment, +2 Sovereign Coals, +5 Mud of Realms, +250 Hacksilver) – Map Hyperlink
From Sindri’s Store, there’s a small path behind it. Take it. On the finish, you can see an exploding jar between gold. Use your blades of chaos to explod
![]()
![]() Odin’s Ravens (1/1) – Map Hyperlink
Odin’s Ravens (1/1) – Map Hyperlink
Keep in the identical space the place you combat The Hateful, place your self close to the sting, and you will note a raven flying round. Earlier than throwing the axe, see the flying sample the raven does. When he’s reaching most peak, it’s fairly close to the placement you’re standing on.

Dragon Seashore
![]()
![]() Nornir Chest – Map Hyperlink
Nornir Chest – Map Hyperlink
Could be discovered, close to the Don’t Breath Rune Learn, one the left aspect. The three runes might be behind geysers. Throw the Leviathan axe to the geyser on the left. You will note the rune, name the axe again and throw it once more to the rune, regardless that you can’t see it to interrupt it. There may be one other one on the again, and makes use of the identical technique. The third one is to the correct of the chest. The rune is behind a fence and you may’t break it from there. Make your strategy to the again of the rune to throw the axe from there and destroy the run, to unlock the chest.


![]()
![]() Lore (1/1) – Map Hyperlink
Lore (1/1) – Map Hyperlink
Rune Reads – Don’t Breathe: As you attain Dragon Seashore, you can see this Rune on the finish, on a picket platform.
![]()
![]() Yggdrasil Rifts (1/1) – +1 Petrified Bone. +1 Luminous Alloy – Map Hyperlink
Yggdrasil Rifts (1/1) – +1 Petrified Bone. +1 Luminous Alloy – Map Hyperlink
As you dock on Dragon Seashore, use the chain on the tower on the left to climb, to the higher stage. On the left column you can see a use for the Draupnir Spear. Use it to help you climb to the subsequent stage, you’ll obtain The Misplaced Treasure aspect quest there. Flip to your left, and climb the ledge. Use the hook to cross, raise the picket beam and you can see the rift on the opposite aspect.
![]()
![]() Buried Treasure 1/1 – Treasure Map – Washed Ashore (Jotunheim’s Advantage – Amulet Enchantment, +1 Petrified Bone, +1 Luminous Alloy, +1 Asgardian Ingot, +40 Shattered Rune) – Map Hyperlink
Buried Treasure 1/1 – Treasure Map – Washed Ashore (Jotunheim’s Advantage – Amulet Enchantment, +1 Petrified Bone, +1 Luminous Alloy, +1 Asgardian Ingot, +40 Shattered Rune) – Map Hyperlink
Could be discovered on the southern a part of the seashore, simply earlier than the skeleton of the large monster.
Jarnsmida Pitmines
![]()
![]() Odin’s Ravens 1/1. – Map Hyperlink
Odin’s Ravens 1/1. – Map Hyperlink
Discovered on the bottom stage, after taking the second practice. Take the chain to achieve the bottom stage. Transfer in direction of the shore and you will note the Raven circling the realm.

![]()
![]() Artifact 1/2 – Map Hyperlink
Artifact 1/2 – Map Hyperlink
Issues Left Behind (Lofnheid’s Whetstone): Discovered on the bottom stage, after taking the second practice. Take the chain to achieve the bottom stage. Transfer in direction of the shore and you can see the artifact there.
![]()
![]() Nornir Chest 1/1 – Map Hyperlink
Nornir Chest 1/1 – Map Hyperlink
Previous the small passageway, and drop from the left till you attain the water wheel. Use the axe to freeze the water that’s passing over the wheel.This can help you move by means of the hole, and use the blades of chaos on the hook to achieve the Nornir Chest. Use the blades of chaos to ignite the primary rune, positioned left of the chest. Drop down on the left aspect, the place you will note a Pink Chest, and switch left once more, to seek out the second rune. Use leviathan axe on the water, to stop it from watering the rune, after which use the blades of chaos to ignite it. To succeed in the third one, use the blades of chaos on the hook to achieve the realm throughout. You may be in entrance of the rune. Ignite the final one.


![]()
![]() Lore (1/1)- Rune Tread (The Pit-Mine) – Map Hyperlink
Lore (1/1)- Rune Tread (The Pit-Mine) – Map Hyperlink
When utilizing the Blades of Chaos on the hook to go to the realm cross whereas resolving the Nornir Chest, flip left to seek out the writing on the wall.
![]()
![]() Artifacts (2/2) Kvasir’s Poems (Instrument and Bang) – Map Hyperlink
Artifacts (2/2) Kvasir’s Poems (Instrument and Bang) – Map Hyperlink
Use the rock hanging from the crane to achieve the opposite aspect. Soar down and attain the sting utilizing the blades of chaos. Transfer ahead till you discover it on the ground.-
![]()
![]() Legendary Chest (1/1) – Map Hyperlink
Legendary Chest (1/1) – Map Hyperlink
Pommels of the Timeless Spark. Want to achieve the opposite aspect utilizing the large rock hanging from the crane. Could be discovered to the correct of Kvasir’s Poem.


![]()
![]() Remnants of Asgard (+20 Tempered Remnants, +50000 Hacksilver) – Map Hyperlink
Remnants of Asgard (+20 Tempered Remnants, +50000 Hacksilver) – Map Hyperlink
After you attain the Mystic Gateway utilizing the rope with the Draupnir Spear, climb the chain and you will note the chest on the left aspect. You’ll have to combat a number of Einherjar.
![]()
![]() Berserker Gravestones 1/1 (Hind of the 9 Realms – Spear Attachment, Gale Flame – Weapon Improve, +80 Bonded Leather-based, +75 Shattered Rune, +5 Tempered Remnants) – Map Hyperlink
Berserker Gravestones 1/1 (Hind of the 9 Realms – Spear Attachment, Gale Flame – Weapon Improve, +80 Bonded Leather-based, +75 Shattered Rune, +5 Tempered Remnants) – Map Hyperlink
You will discover the Berserker Headstone as you exit the tunnel and are available out exterior from the Applecore. You’ll have to combat two highly effective bosses.
Lyngbakr Island
![]()
![]() Lore (1/1) Lore Marker – Map Hyperlink
Lore (1/1) Lore Marker – Map Hyperlink
Relating to the elimination of sources: After eradicating the primary set of chains, head to the picket space and soar throughout the hole. Struggle some Nightmares after which climb the chain. The Lore Marker might be in your proper.
![]()
![]() Artifacts (1/1). Kvasir’s Poems – Map Hyperlink
Artifacts (1/1). Kvasir’s Poems – Map Hyperlink
We who stay, Half the second.: Positioned on the identical excessive space the place you discovered the purple chest, there might be a corpse that comprises a poem.
![]()
![]() Odin’s Ravens (1/1) – Map Hyperlink
Odin’s Ravens (1/1) – Map Hyperlink
When you handle to open the trail to the hook utilizing exploding bombs, there might be a small passageaway through which Kratos might want to crouch to move by means of. When you come out on the othe aspect, flip left to see the raven just a few meters away from you. Throw the Leviathan Axe at it to kill it.

![]()
![]() Legendary Chest (1/1) – Map Hyperlink
Legendary Chest (1/1) – Map Hyperlink
Head to the tail utilizing your boat and begin climbing. There might be a combat on the high. After it, climb the ledge in your left to seek out the ultimate chain on the creature. Work together with it to launch it. You’ll have to soar to the subsequent platform and use the rope to have the ability to absolutely free the creature.Take the rope, and you can see on the finish a Legendary Chest.


![]()
![]() The Weights of Chains 1/1 – Map Hyperlink
The Weights of Chains 1/1 – Map Hyperlink
Full The Weight of Chains Favor in an effort to full it. You must free the large monster chained within the water, after which get close to to its eye.
The Forge
![]()
![]() Odin’s Ravens (1/2) – Map Hyperlink
Odin’s Ravens (1/2) – Map Hyperlink
As quickly as you exit the primary practice, head down the highway till there’s a mountain peak in your proper. You’ll discover the raven circling round. Hit it together with your axe

![]()
![]() Artifact 1/1 – Map Hyperlink
Artifact 1/1 – Map Hyperlink
Issues Left Behind (Bari’s Grenade): Transfer ahead as you exit the practice, and climb the primary ledge in your left, then flip left once more and drop down. Destroy the crate by hitting it, to seek out the artifact.
![]()
![]() Nornir Chests 1/1 – Map Hyperlink
Nornir Chests 1/1 – Map Hyperlink
The Nornir chest could be discovered at first of the extent, however you’re unable to open it at the moment since you want the Draupnir Spear. As soon as you’re right here, it’s important to Embed spears in every of the three runes after which detonate them unexpectedly. The primary one could be discovered on the mountain throughout. The second could be discovered on the left aspect. To seek out the third one, flip again to the picket bridge-like construction at first of the extent. As soon as all three are embedded, detonate them to open the chest.


![]()
![]() Legendary Chests 1/1 – Map Hyperlink
Legendary Chests 1/1 – Map Hyperlink
After fixing the Elevator puzzle with Brok, the gate will open to disclose a Legendary Chest with Atlas Eruption – Heavy Runic Assault for the Blades of Chaos.


![]()
![]() Odin’s Ravens 2/2 – Map Hyperlink
Odin’s Ravens 2/2 – Map Hyperlink
After taking the raise with Brok, proceed ahead and move the small cave. As soon as exterior, drop down and look as much as your left to seek out the Raven.

![]()
![]() Lore 1/2 (Rune Learn – The Forge) – Map Hyperlink
Lore 1/2 (Rune Learn – The Forge) – Map Hyperlink
After the boss combat with Dreki, squeeze by means of a niche, and head proper transfer ahead and switch proper once more till you discover a climbable ledge.flip left and transfer ahead till you discover a huge gate. The runes are on the correct aspect.
![]()
![]() Lore 2/2 (Lore Scroll – Expensive Overseer) – Map Hyperlink
Lore 2/2 (Lore Scroll – Expensive Overseer) – Map Hyperlink
Soar by means of the hole previous the picket bridge, to achieve a brand new space the place you can see a lore scroll just a few steps to your proper
![]()
![]() Yggdrasil Rifts 1/2 (Hind of Attuned Components – Spear Attachment, +5 Mud of Realms +2 Lyndwyrm Scales, +1000 Hacksilver) – Map Hyperlink
Yggdrasil Rifts 1/2 (Hind of Attuned Components – Spear Attachment, +5 Mud of Realms +2 Lyndwyrm Scales, +1000 Hacksilver) – Map Hyperlink
Within the space the place Brok teaches you to climb utilizing the Draupnir Spear, you may attain a Yggdrasil Rift. Use the primary embed level, however don’t climb simply but. Flip to your left, and search for one other one on the next stage. Throw the spear once more to create a second path. Use each new traversal paths to achieve the extent with the Yggdrasil’s Rift.
![]()
![]() Yggdrasil Rifts 2/2 (+15 Mud of Realms, +6 Stonewood, +8 Dwarven Metal, +4 Honed Steel +1000 Hacksilver) – Map Hyperlink
Yggdrasil Rifts 2/2 (+15 Mud of Realms, +6 Stonewood, +8 Dwarven Metal, +4 Honed Steel +1000 Hacksilver) – Map Hyperlink
After opening the massive gate with Freya and assembly the Einherjar Warriors for the primary time, drop down in your proper, flip left and proceed till you attain the small hole between the rocks. Squeeze there, and the Rift might be on this room.
The Applecore
![]()
![]() 1/1 Relic (Talisman of Meign) – Map Hyperlink
1/1 Relic (Talisman of Meign) – Map Hyperlink
Unmissable. Gamers should decide it up throughout Fundamental Mission 02: The Quest for Tyr to progress additional within the story.
![]()
![]() Lore 1/3 – Rune Reads (The Vault) – Map Hyperlink
Lore 1/3 – Rune Reads (The Vault) – Map Hyperlink
From Sindri’s Store on the applecore, take the one path out there and command Atreus to shoot Sonic Arrows on the decaying picket wall.
![]()
![]() Lore (2/3) – Lore Marker (Cooperation) – Map Hyperlink
Lore (2/3) – Lore Marker (Cooperation) – Map Hyperlink
After a combat with just a few Draugr, you’ve got two paths forward of you. The left one which ascends and the correct one which results in a decaying picket wall. Take the correct one, break the wall by hitting it and drop down to seek out the Lore Marker.
![]()
![]() Lore (3/3) (Treasure Map – Demise of Dagestr) – Map Hyperlink
Lore (3/3) (Treasure Map – Demise of Dagestr) – Map Hyperlink
Down the picket raise that takes you from the ritual website to the underground. Comply with the linear path previous the enemy creatures and the zipline to the west. Go down the ledge and switch proper to climb the wall. Subsequent to a lifeless physique.
![]()
![]() Artifact (1/3) – Issues Left Behind (Durinn’s Stone Statue) – Map Hyperlink
Artifact (1/3) – Issues Left Behind (Durinn’s Stone Statue) – Map Hyperlink
Use the Blades of Chaos on the hook that has a waterfall falling on it, and cross to the opposite aspect. Flip left and drop down. Command Atreus to shoot the particles along with his Sonic Arrows, to disclose the Artifact.
![]()
![]() Draugr Gap 1/1 (+500 Hacksilver. +15 Mud of Realms, +2 Sovereign Coals, Chaos Spark – Weapon Improve) – Map Hyperlink
Draugr Gap 1/1 (+500 Hacksilver. +15 Mud of Realms, +2 Sovereign Coals, Chaos Spark – Weapon Improve) – Map Hyperlink
In the identical room the place you discover Durinn’s Stone Statue, you can see an enormous door. Open it to seek out the Draugr Gap.
![]()
![]() Legendary Chest (1/2) Fortified Frost Knob – Map Hyperlink
Legendary Chest (1/2) Fortified Frost Knob – Map Hyperlink
In the identical room the place you discover the Berserker Headstone and combat The Hateful within the Applecore. You will discover the chest behind the room.


![]()
![]() Odin’s Ravens (1/1) – Map Hyperlink
Odin’s Ravens (1/1) – Map Hyperlink
You will discover it perched on a small hole, contained in the mines. Simply earlier than the final room you’re about to expLore with Atreus. Flip again after reuniting with him, and you will note the Raven. Use the Leviathan Axe to destroy it.

![]()
![]() Nornir Chests 1/2 – Map Hyperlink
Nornir Chests 1/2 – Map Hyperlink
You must use the Draupnir Spear to open this chest. It may be discovered close to the place the place you’ve got discovered the Treasure Map, simply climb as much as the left aspect. You will discover the primary two runes reverse to the chest, hanging from the ceiling. The final one is discovered to the correct of the chest, you’ll need to climb to the highest of the rocks and switch round to seek out it.


![]()
![]() Nornir Chests 2/2 – Map Hyperlink
Nornir Chests 2/2 – Map Hyperlink
From the placement the place you discover the Althjof’s Statue artifact, use the spear to achieve the platform to the north. The primary system is on the room west of the chest. The second is on the west-most a part of the platform, behind some rocks you have to blow up first. The final one is subsequent to the watermill on the east aspect of the realm. You may see it from the sting of the platform the place the chest is.


![]()
![]() Legendary Chest 2/2 (Banahogg Knob – Axe Attachment) – Map Hyperlink
Legendary Chest 2/2 (Banahogg Knob – Axe Attachment) – Map Hyperlink
From the north gate of the placement with the Nornir Chest, flip left (west) and undergo a small passage on the wall (Img68). Comply with the trail and climb the ledge. When you get out, flip proper (west) till you discover a Runic Learn in your left (Img69), which opens a secret door subsequent to it that conceals the Legendary Chest.


![]()
![]() Artifacts 2/3 (Kvasir’s Poems – Sanguine) – Map Hyperlink
Artifacts 2/3 (Kvasir’s Poems – Sanguine) – Map Hyperlink
Soar down the ledges positioned simply west of the Nornir Chest, and observe the trail north. Use the spear to climb the ledge that you just come throughout and proceed till you can also make a flip left (north).
![]()
![]() Artifacts 3/3 (Issues Left Behind – Althjof’s Statue) – Map Hyperlink
Artifacts 3/3 (Issues Left Behind – Althjof’s Statue) – Map Hyperlink
Throughout and west of the picket gate positioned north of the place the projectile-throwing enemy is.
![]()
![]() Buried Treasure 1/1 Treasure Map – Mining Glory (+1 Petrified Bone, +1 Luminous Alloy, +1 Asgardian Ingot, +40 Shattered Rune, Muspelheim’s Blessing – Amulet Enchantment) – Map Hyperlink
Buried Treasure 1/1 Treasure Map – Mining Glory (+1 Petrified Bone, +1 Luminous Alloy, +1 Asgardian Ingot, +40 Shattered Rune, Muspelheim’s Blessing – Amulet Enchantment) – Map Hyperlink
After getting the treasure map, you’ll find it on the realm that it’s important to soar by means of the water move to achieve the opposite aspect.
![]()
![]() Yggdrasil Rifts 1/1 (Gale Flame – Weapon Improve,+100 Mud of Realms, +4 Lyndwyrm Scales +4, +10000 Hacksilver – Map Hyperlink
Yggdrasil Rifts 1/1 (Gale Flame – Weapon Improve,+100 Mud of Realms, +4 Lyndwyrm Scales +4, +10000 Hacksilver – Map Hyperlink
Subsequent to the placement of the second system to unseal the second Nornir Chest.
Myrkr Tunnels
![]()
![]() Legendary Chest 1/1 (Fog of Fimbulwinter) – Map Hyperlink
Legendary Chest 1/1 (Fog of Fimbulwinter) – Map Hyperlink
Use Sigil Arrows and Blade of Chaos to destroy the roots forward so you may entry a Legendary Chest

![]()
![]() Nornir Chest 1/1 – Map Hyperlink
Nornir Chest 1/1 – Map Hyperlink
When you attain the Myrkr Nornir Chest, activate the primary construction on the left earlier than the chest. Return just a few steps till you see a stack of crates on the wall, break them to discover a hidden construction that you have to set on fireplace as effectively. Then head in direction of the Nordic Chest, and in your left you may gentle up the final construction utilizing Sigil Arrows.


![]()
![]() Yggdrasil Rifts 1/1 – Map Hyperlink
Yggdrasil Rifts 1/1 – Map Hyperlink
After defeating each enemies, you can see it on the finish of the trail
Alberich Hole
![]()
![]() 1/1 Relic (Hilt of Dainsleif) – Map Hyperlink
1/1 Relic (Hilt of Dainsleif) – Map Hyperlink
Crafted with Svefnthorn. Gamers can receive this crafting materials by defeating Ormstunga, close to the tip of Alberich Hole.
![]()
![]() Odin’s Ravens (1/1) – Map Hyperlink
Odin’s Ravens (1/1) – Map Hyperlink
Discovered after you take away the gold to enter the cave on Alberich Hole. The Raven could be discovered on the left aspect, close to a tree.

![]()
![]() Yggdrasil Rift (1/1) – Map Hyperlink
Yggdrasil Rift (1/1) – Map Hyperlink
Proper after the combat with Ormstunga, transfer ahead and switch left to discover a small ledge. The rift could be discovered there. Work together with it.
![]()
![]() Legendary Chest 1/2 (Muspelheim Seed Half) – Map Hyperlink
Legendary Chest 1/2 (Muspelheim Seed Half) – Map Hyperlink
Use the hearth bombs to free the legendary chest.


![]()
![]() Legendary Chest (Folkvangr Whetstone, +5000 Hacksilver) – Map Hyperlink
Legendary Chest (Folkvangr Whetstone, +5000 Hacksilver) – Map Hyperlink
After defeating Ormstunga, proceed shifting ahead, take away the gold and the chest might be on a small picket shaft, to the left aspect, unattainable to overlook.


![]()
![]() Lore 1/1 Treasure Map – Fruits of Trade – Map Hyperlink
Lore 1/1 Treasure Map – Fruits of Trade – Map Hyperlink
Fruits of Trade: After defeating Ormstunga, proceed shifting ahead, take away the gold and take the trail to the correct (don’t head down but). You will discover the Treasure map on the bottom, close to some crates.
![]()
![]() Remnants of Asgard 1/1 (+20 Tempered Remnants, +50000 Hacksilver) – Map Hyperlink
Remnants of Asgard 1/1 (+20 Tempered Remnants, +50000 Hacksilver) – Map Hyperlink
In the identical space through which Freya reads the Rune Learn. You will discover the scroll Defend the Jail.
![]()
![]() Yggdrasil Rifts 1/1 (Gale Spark – Weapon Improve, +15 Mud of Realms, +2 Lyndwyrm Scales, +2000 Hacksilver) – Map Hyperlink
Yggdrasil Rifts 1/1 (Gale Spark – Weapon Improve, +15 Mud of Realms, +2 Lyndwyrm Scales, +2000 Hacksilver) – Map Hyperlink
Proper after the combat with Ormstunga, transfer ahead and switch left to discover a small ledge. The rift could be discovered there. Work together with it.
![]()
![]() The Misplaced Treasure 1/1 – Map Hyperlink
The Misplaced Treasure 1/1 – Map Hyperlink
It Completes while you open the Second Legendary Chest within the space.
Jotunheim
Angrboda’s Treehouse
![]()
![]() 9 Realms in Bloom in Bloom 1/1 – Map Hyperlink
9 Realms in Bloom in Bloom 1/1 – Map Hyperlink
From the Mystic Gateway, take the left path all the best way to seek out the flower.
Helheim
Helgrind
![]()
![]() Odin’s Ravens 1/2 – Map Hyperlink
Odin’s Ravens 1/2 – Map Hyperlink
Transfer ahead till Atreus is unable to proceed shifting, you can see a Raven circling the realm, barely to the left.

![]()
![]() Lore 1/2 ( Rune Learn – Prayer to Hraesvelgr) – Map Hyperlink
Lore 1/2 ( Rune Learn – Prayer to Hraesvelgr) – Map Hyperlink
After going through the Hel troopers for the primary time within the space, climb the ledges to achieve this rune learn.
![]()
![]() Odin’s Ravens 2/2 – Map Hyperlink
Odin’s Ravens 2/2 – Map Hyperlink
From Hel’s Perch Mystic Gateway, transfer ahead and switch to the left aspect as quickly as potential. Climb up, and switch left once more. Preserve shifting ahead till you discover the Lore Marker. You will discover the Raven behind the Lore marker.

![]()
![]() Lore 2/2 (Lore Marker -Hraesvelgr) – Map Hyperlink
Lore 2/2 (Lore Marker -Hraesvelgr) – Map Hyperlink
After passing the primary gate that requires sigil arrows following Garm’s taming, the Lore marker might be simply in entrance of you.
The Gleaming Bale
![]()
![]() Hel Tear 1/1 (Frozen Spark, +15 Mud of Realms, +2000 Hacksilver, Grip of Therapeutic Concord) – Map Hyperlink
Hel Tear 1/1 (Frozen Spark, +15 Mud of Realms, +2000 Hacksilver, Grip of Therapeutic Concord) – Map Hyperlink
As quickly as you uncover The Gleaming Bale, you can see the tear there.
Hel’s Perch
![]()
![]() 9 Realms in Bloom in Bloom 1/1 – Map Hyperlink
9 Realms in Bloom in Bloom 1/1 – Map Hyperlink
Discovered after Atreus manages to tame Garm, flip to your proper and search for an area to throw the Draupnir Spear. Then climb up and use the spear to cross to the opposite aspect and seize the flower.


